
Background image for the Features page
A photo of a tablet
The background of the tablet's screen
The Features icon animated on the tablet's screen
The Features text heading animated on the tablet's screen

Website Features

Website Features

With the ever increasing costs facing businesses, I wanted to provide an affordable web design service to help out.

So I developed my own custom software, specifically designed to create effective websites without breaking the bank.

To see how your website could look view my demos, or keep scrolling for the full specification.

How does it work?

How does it work?

Your website will be divided up into different sections, such as About us, Our Services, Photo Gallery, Contact Details & Enquiry Form.

You'll be able to edit all of these sections, as well as change the order they appear on your website (from top to bottom).

Admin Control Panel

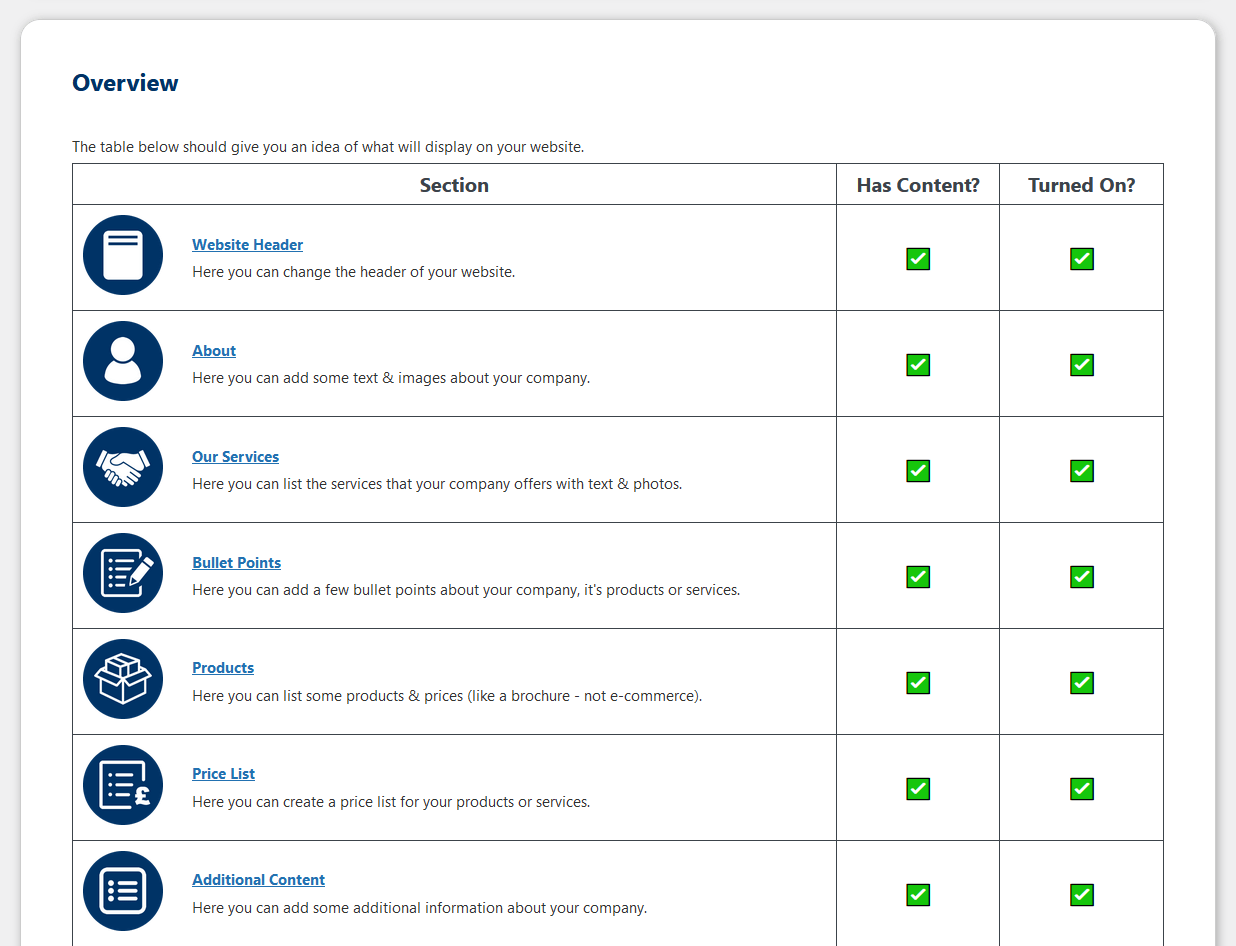
Below are some screenshots of the main control panel.
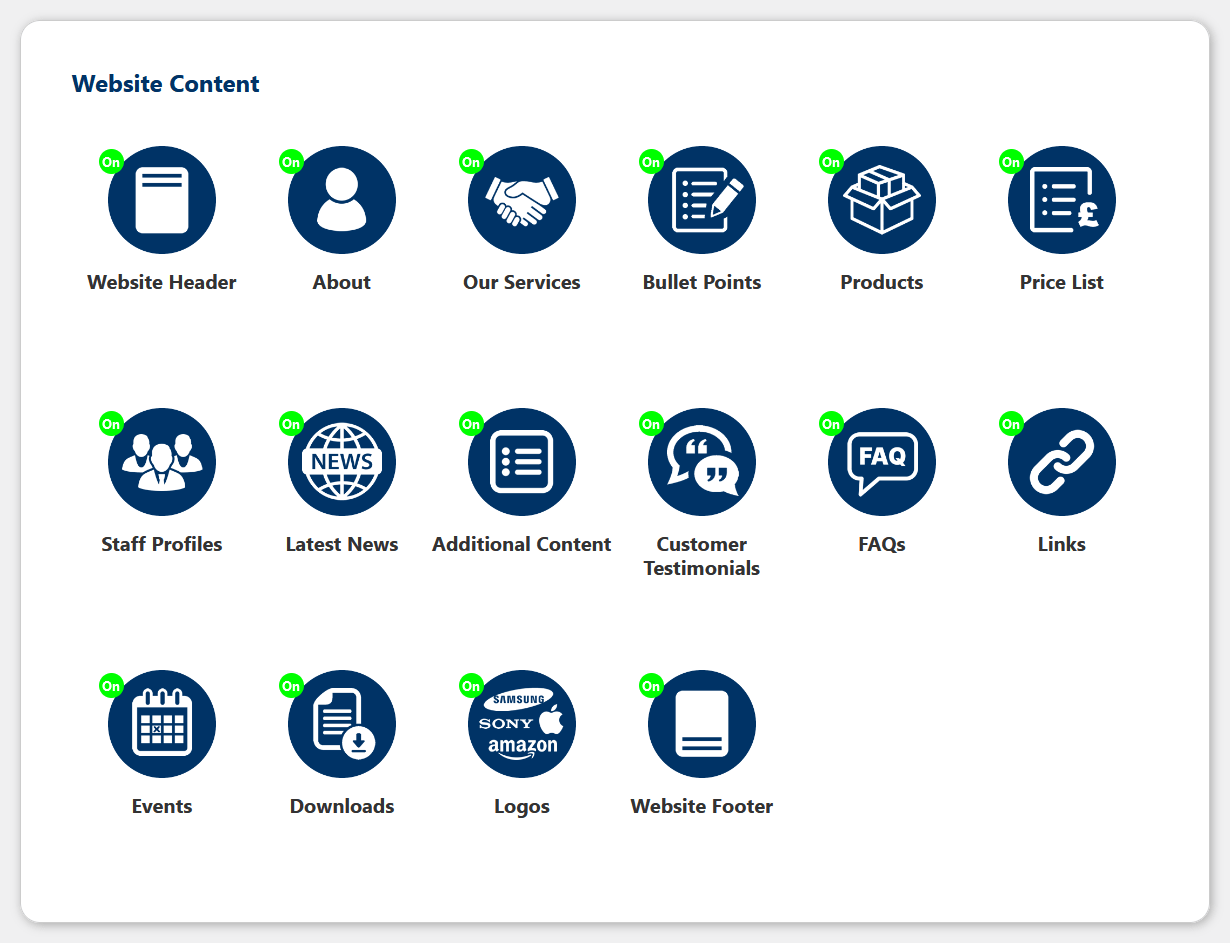
Screenshot of the Admin Control PanelScreenshot of the Admin Control PanelScreenshot of the Admin Control PanelScreenshot of the Admin Control PanelScreenshot of the Admin Control PanelScreenshot of the Admin Control Panel

Keep scrolling for details on all of these sections & settings.

Complete List of Features

Complete Features

Most websites will typically only require a few of these sections; nevertheless, here's a complete list of all the features I've developed.

Any Questions? Please get in touch.

Main Sections
×
Website Header
Website Header

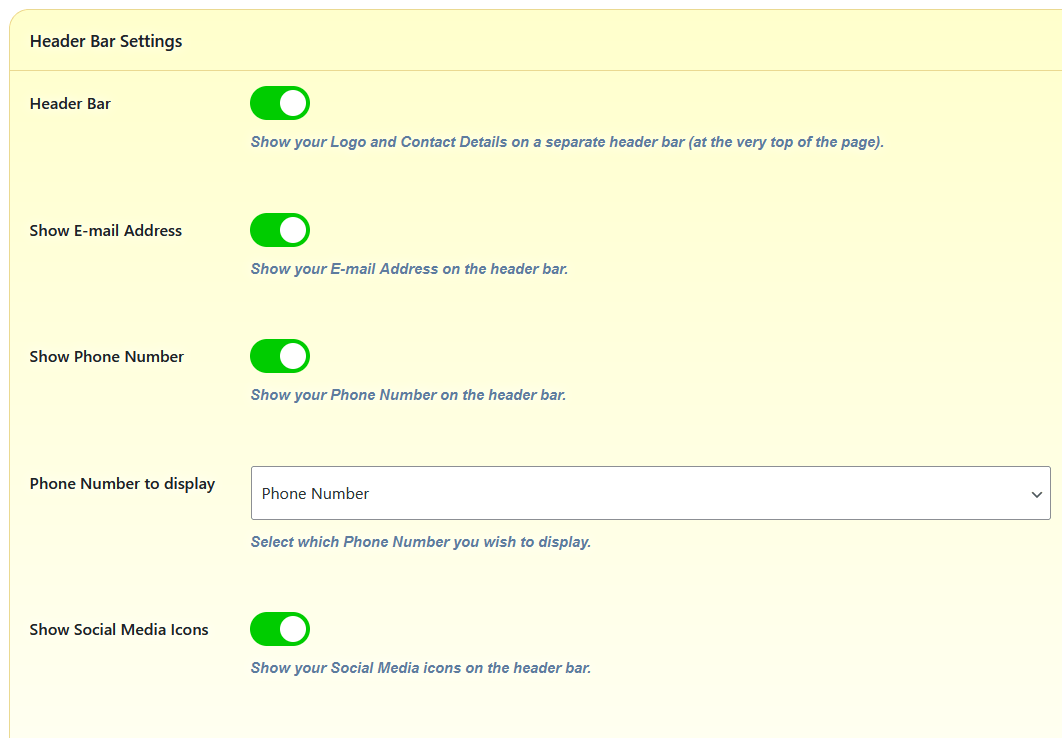
The Header section enables you to change the items at the top of your website, such as your logo, titles & icons.

Obviously this will all be setup for you in the first place, but here's a summary of the items you can change on your website's header.

Header Bar

This is the header bar across the very top of the page.

  • Show/Hide the Header Bar.
  • Show/Hide an E-mail icon.
  • Show/Hide a Phone or Mobile icon.
  • Select which phone number to display.
  • Show/Hide Social Media Icons.
  • Select any 2 of your social media icons to display.
Logo

Change your logo as required.

  • Replace your Logo.
  • Edit Logo "Alt" text.
  • Show/Hide your logo.

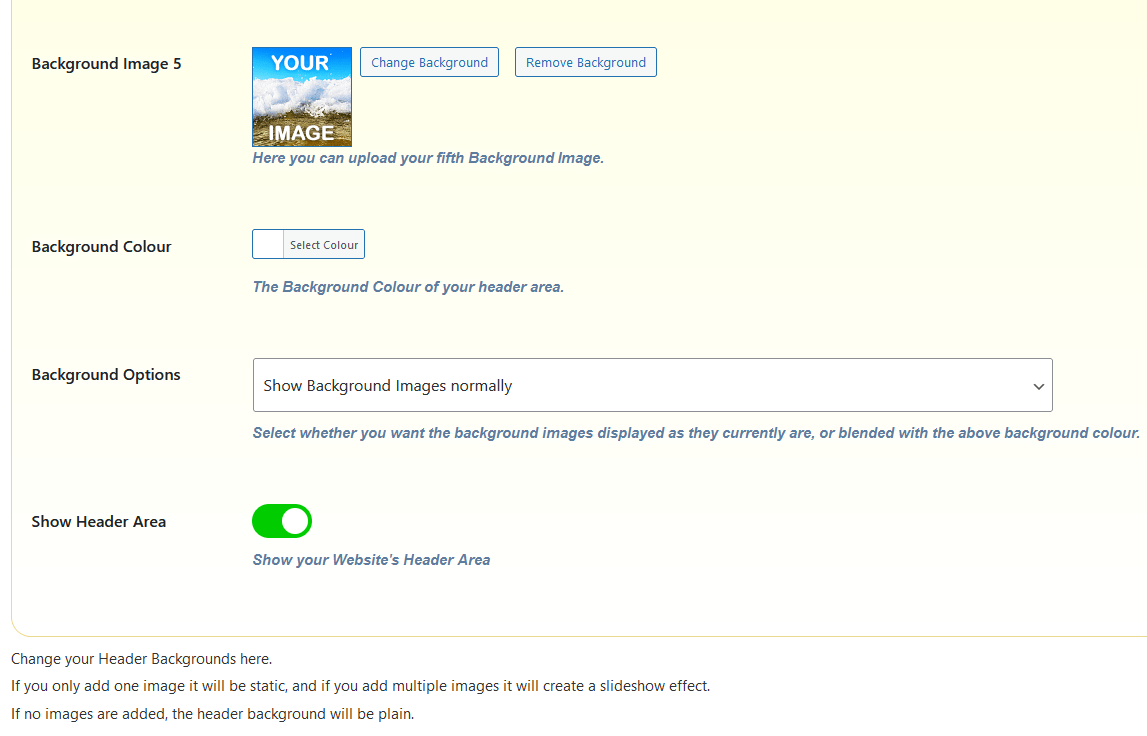
Underneath the Header Bar, you can have a Header Area displaying your main headings & buttons for visitors to get in touch.

Header Area
  • Add up to 5 Background Images to fade in & out.
  • Or select a single static Background Image.
  • Change the Background Colour.
  • Change Blending options for background images.
  • Show/Hide the Header Area.
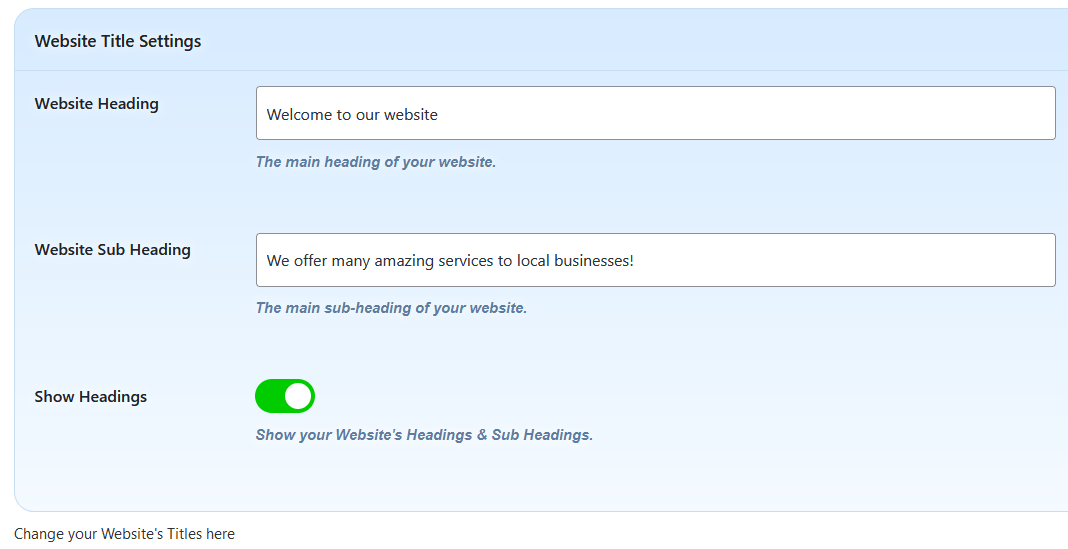
Headings

Change your website's main headings.

  • Edit the website's heading (H1).
  • Edit the website's sub heading (H2).
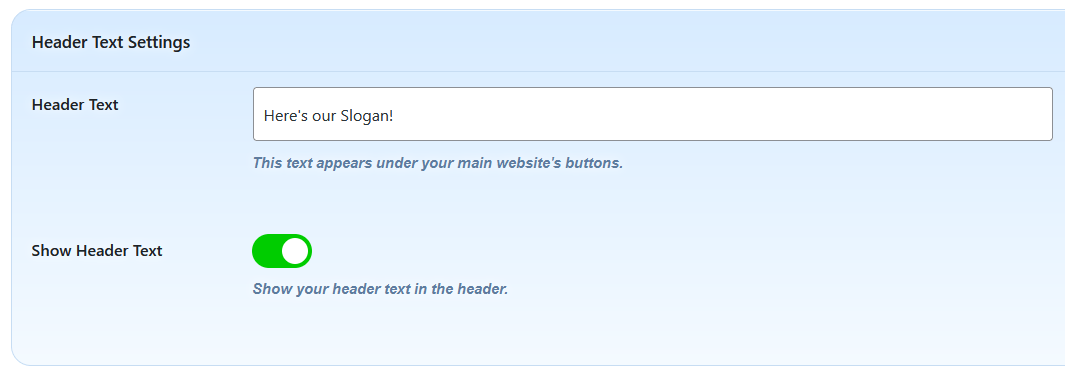
  • Edit the website's slogan.
  • Show/Hide these Headings.
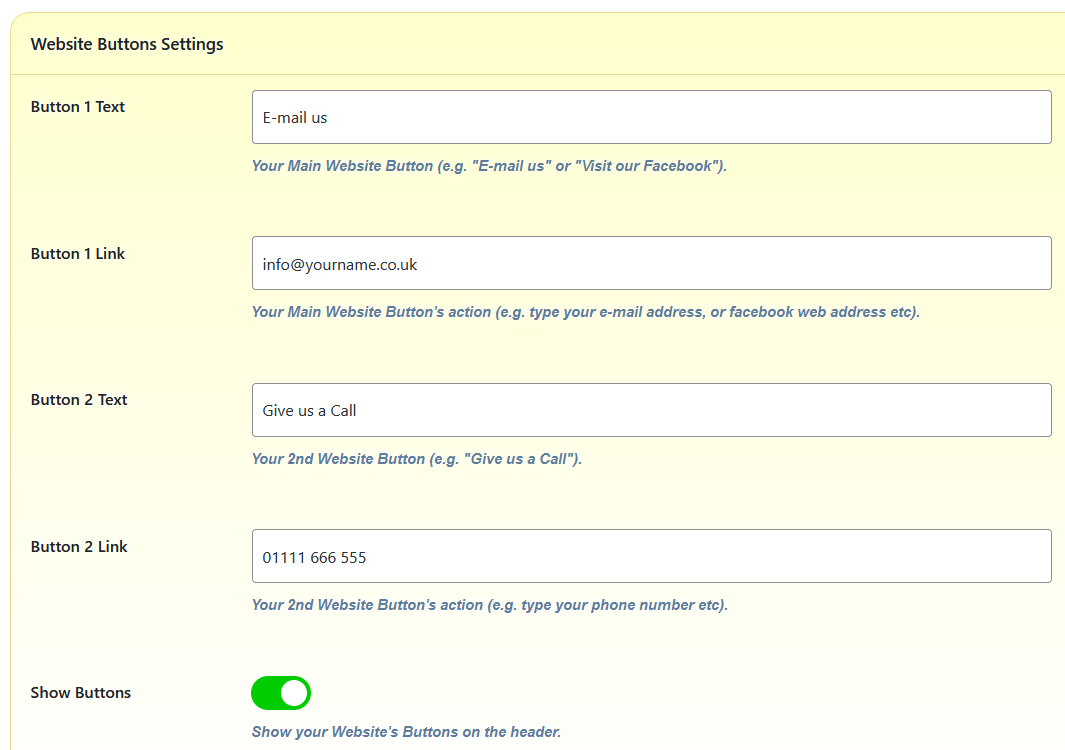
Website Buttons

Change your main Call-to-Action buttons.

  • Add your main Call-to-Action Button (e.g. "E-mail us" or "Visit our Facebook").
  • Add a secondary Call-to-Action Button (e.g. "Give us a call").
  • Change where these buttons link to (e.g. e-mail address, web address, Facebook page, phone number etc).
  • Show/Hide these Buttons.
Admin Screenshots

Here are some screenshots of the admin control panel, so you get an idea of how it works.
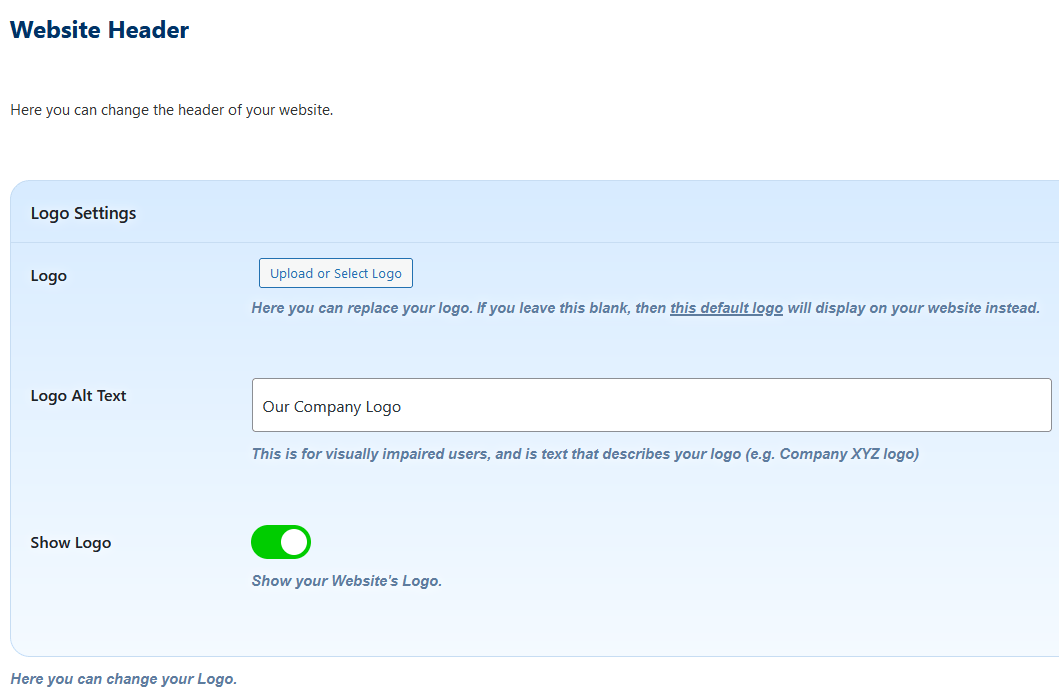
Screenshot of the Header admin sectionScreenshot of the Header admin sectionScreenshot of the Header admin sectionScreenshot of the Header admin sectionScreenshot of the Header admin sectionScreenshot of the Header admin section
×
About
About

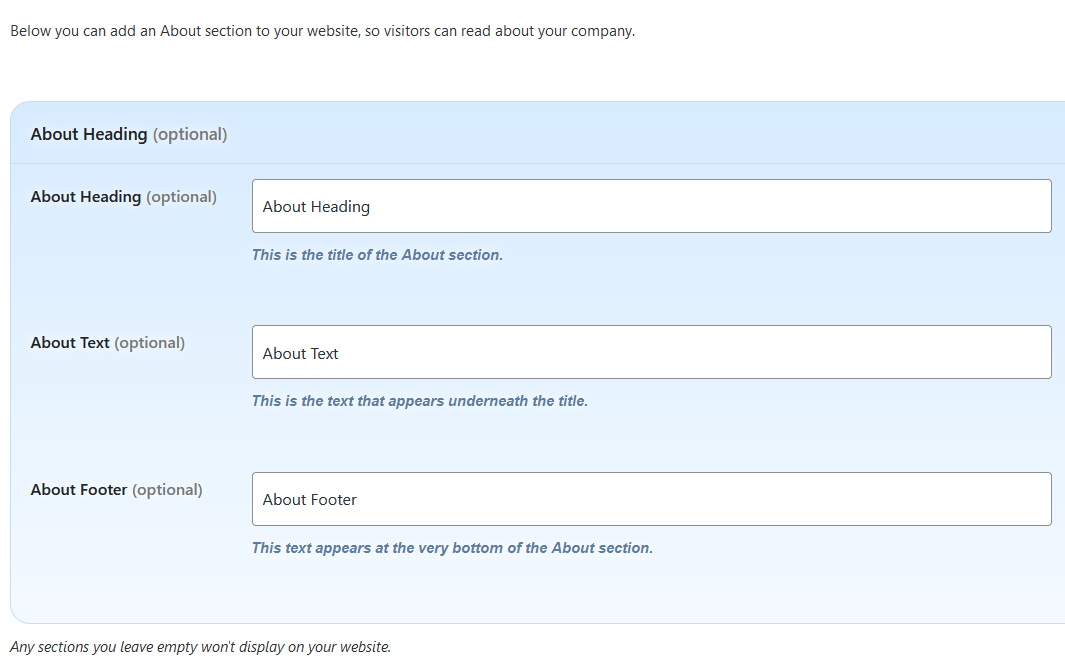
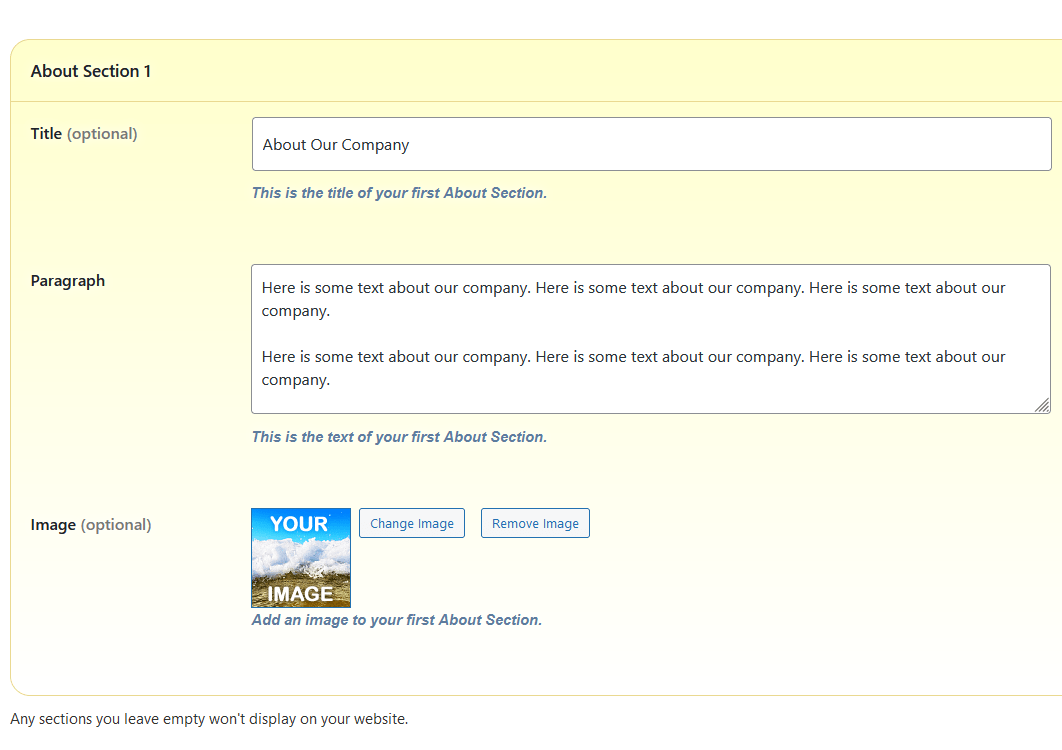
The About section enables you to include some text & images about your company.

Here's a summary of the items you can change in your About section.

About Headings

For the About section you can:

  • Add/Edit a main "About" Title (e.g. "About us").
  • Add/Edit text underneath this Title (e.g. "Here's some info about our company").
  • Add/Edit text at the bottom of the About Section (e.g. "Any questions? Get in touch!").
About Items

For each item in this section you can:

  • Edit the Title (e.g. "About our Company").
  • Edit the Text (e.g. "We were founded in 2018 etc..").
  • Add/Remove an image.
  • Add Additional Text to load in a Lightbox.
  • Edit the Lightbox Button text (e.g. "More Details").
  • Show/Hide this Lightbox feature.
  • Display a Call-to-Action Button (e.g. "E-mail us!").
  • Edit the Link for this Button (e.g. your e-mail address).
  • Show/Hide this Button.
About Layout

You can adjust the following layout settings:

  • Display images with regular corners, rounded corners or as circles.
  • Change image layout (left/right/alternating).
About Settings

You can also adjust the following settings:

  • Show/Hide the images.
  • Make images clickable so visitors can see the larger version.
  • Show/Hide icons on the images.
Number of About Items

You can also set the number of About items you can edit:

  • Select between 4 & 10 About items.

These items will only display if content is added to them - if they're blank then they won't show on your website.

About Screenshots

Here are some screenshots of the About section, so you get an idea of how it works.
Screenshot of the About admin sectionScreenshot of the About admin sectionScreenshot of the About admin sectionScreenshot of the About admin sectionScreenshot of the About admin section
×
Services
Services

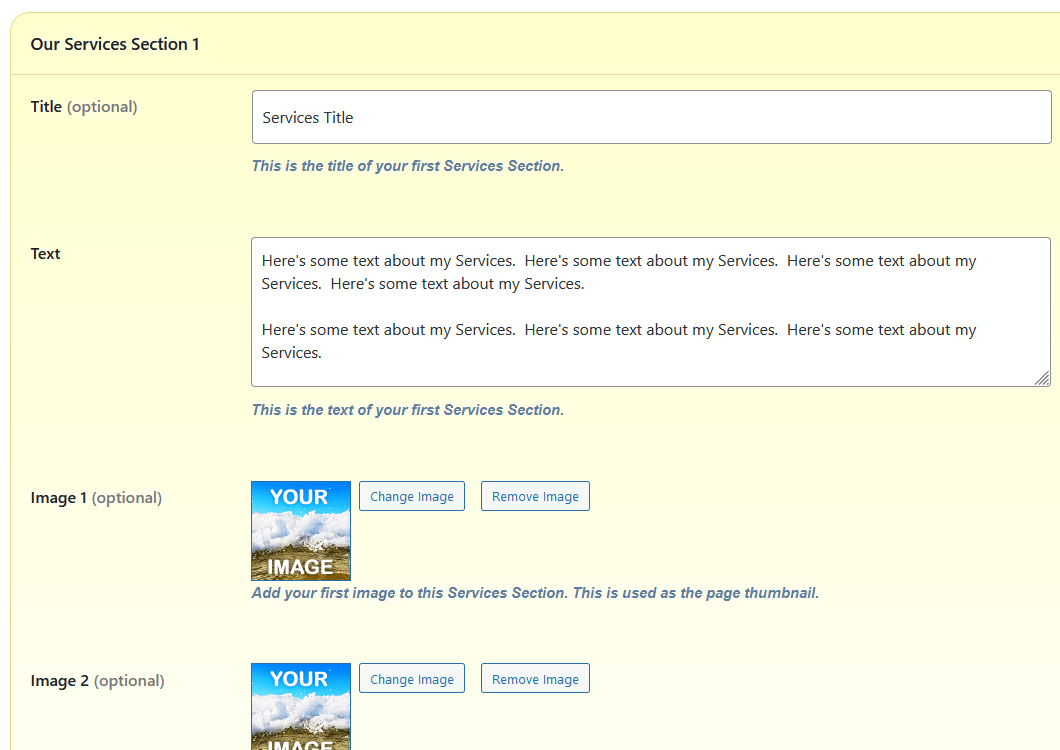
The Services section enables you to include some text & images about the services your company offers.

Here's a summary of the items you can change in your Services section.

Services Headings

For the Services section you can:

  • Add/Edit a main "Services" Title (e.g. "Our Services").
  • Add/Edit text underneath this Title (e.g. "We offer the following services:").
  • Add/Edit text at the bottom of the Services Section (e.g. "Need anything else? Get in touch!").
Our Services items

For each service you offer you can:

  • Edit the Title (e.g. "Web Design").
  • Edit the Text.
  • Add/Remove up to 3 images.
Services Settings

You can also adjust the following settings:

  • Show/Hide icons on the images.
Number of Services Items

You can also set the number of Services items you can edit:

  • Select between 4 & 10 Services.

These items will only display if content is added to them - if they're blank then they won't show on your website.

Services Screenshots

Here are some screenshots of the Services section, so you get an idea of how it works.
Screenshot of the Services admin sectionScreenshot of the Services admin sectionScreenshot of the Services admin section
×
Bullet Points
Bullet Points

The Bullet Points section enables you to list a quick summary of your company, it's products or services.

Here's a summary of the items you can change in your Bullet Points section.

Bullet Points Headings

For the Bullet Points section you can:

  • Add/Edit a main "Bullet Points" Title (e.g. "What We Offer").
  • Add/Edit text underneath this Title (e.g. "A quick guide to our products/services").
  • Add/Edit text at the bottom of the Bullet Points Section (e.g. "Any questions? Please get in touch!").
Bullet Point items

For each item in this section you can:

  • Edit the Title (e.g. "Eco Friendly").
  • Edit the Text (e.g. "We use environmentally friendly products").
  • Add/Remove an image.
Bullet Points Settings

You can also adjust the following settings:

  • Show/Hide additional information when clicking on each bullet point.
Number of Bullet Point Items

You can also set the number of bullet points you can edit:

  • Select between 12 & 24 Bullet Points.

Bullet Points will only display if content is added to them - if they're blank then they won't show on your website.

Bullet Points Screenshots

Here are some screenshots of the Bullet Points section, so you get an idea of how it works.
Screenshot of the Bullet Points admin sectionScreenshot of the Bullet Points admin sectionScreenshot of the Bullet Points admin section
×
Products
Products

The Products section enables you to list your products & prices like a brochure.

Please note: this isn't e-commerce (taking payments online) but I can provide you with a quotation for this.

Here's a summary of the aspects you can edit in your Products section.

Products Headings

For the Products section you can:

  • Add/Edit a main "Products" Title (e.g. "Our Products").
  • Add/Edit text underneath this Title (e.g. "Here's a selection of our products").
  • Add/Edit text that displays underneath each product (e.g. "Phone XXXX to order").
  • Add/Edit text at the bottom of the Products Section (e.g. "All designs copyright © Our Company.").
Products

For each product in this section you can:

  • Edit the Product Name (e.g. "My Product").
  • Edit the Product's Description.
  • Add/Remove up to 3 images per product.
  • Edit the Price (e.g. "£10.00").
  • Edit the RRP (if required - e.g. "£20.00").
  • Mark the Product as "Sold".
  • Add a link to where you can Buy the Product.
Sorting Options

Visitors to your website will be able to sort your products by:

  • Name - A to Z (e.g. Alphabetical)
  • Name - Z to A (e.g. Reverse Alphabetical)
  • Price - Low to High (e.g. Cheapest to Most Expensive)
  • Price - High to Low (e.g. Most Expensive to Cheapest)
Products Settings

You can also adjust the following settings:

  • Show/Hide Prices.
  • Show/Hide RRPs.
  • Show/Hide Sort Options (A-Z, Low to High etc).
  • Show/Hide Icons on Product thumbnails.
Number of Products

You can also set the number of products you can edit:

  • Select between 20 & 50 products.

Products will only display if content is added to them - if they're blank then they won't show on your website.

Products Screenshots

Here are some screenshots of the Products section, so you get an idea of how it works.
Screenshot of the Products admin sectionScreenshot of the Products admin sectionScreenshot of the Products admin sectionScreenshot of the Products admin sectionScreenshot of the Products admin section
×
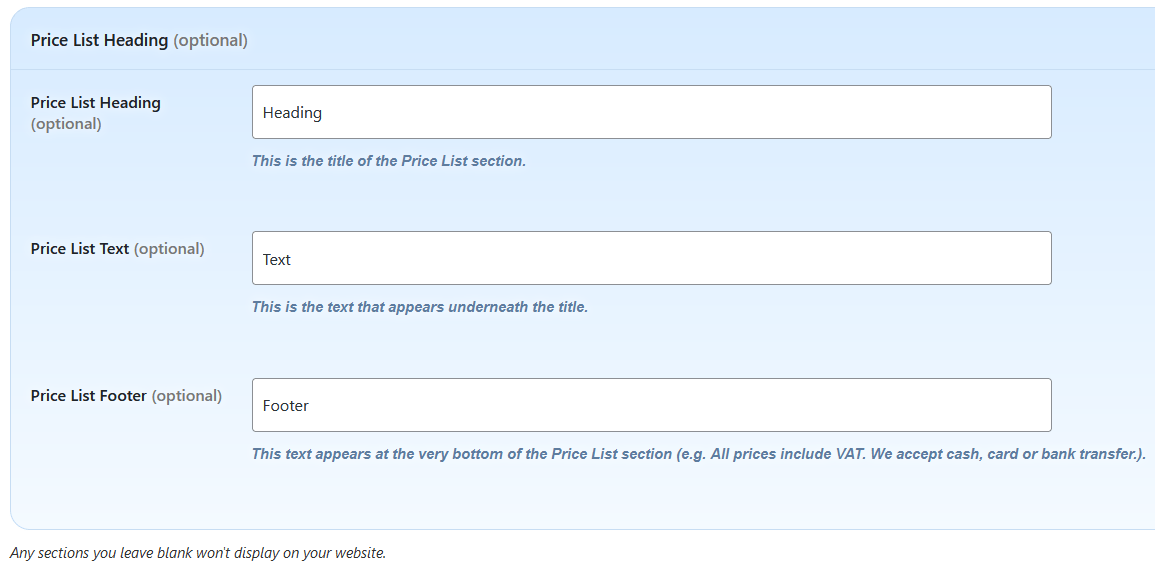
Price List
Price List

The Price List section enables you to publish a table of prices for your products or services.

Here's a summary of the items you can change in your Price List section.

Price List Headings

For the Price List section you can:

  • Add/Edit a main "Price List" Title (e.g. "Our Prices").
  • Add/Edit text underneath this Title (e.g. "A quick guide to our pricing").
  • Add/Edit text at the bottom of the Price List Section (e.g. "All payments must be made in advance.").
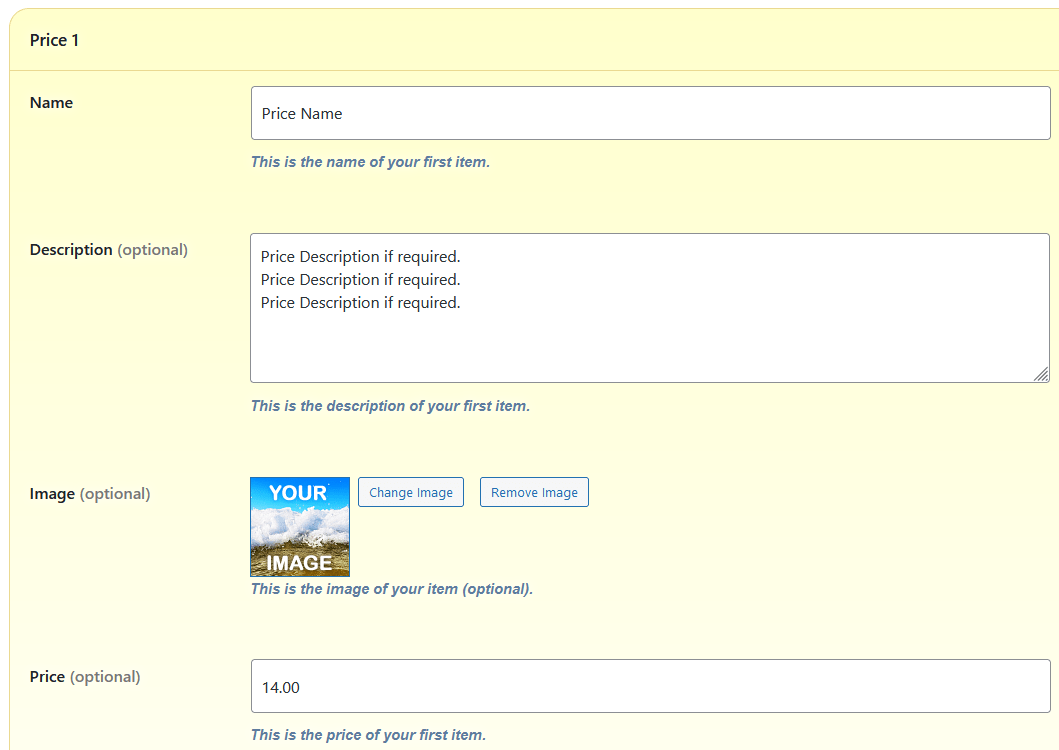
Prices

For each individual price in this section you can:

  • Edit the Name (e.g. "Boiler Service").
  • Edit the Description (e.g. "A quick service of your boiler.").
  • Add/Remove an image.
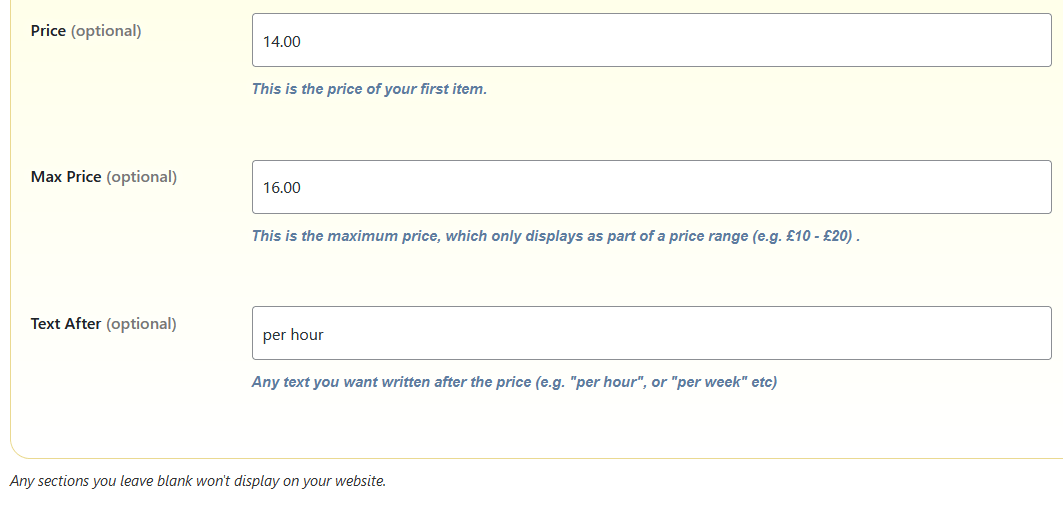
  • Add a Price (e.g. "£50").
  • Add a Maximum Price (if you would like a price range like "£50 to £60").
  • Add some text after (e.g. "per hour" or "per session" etc).
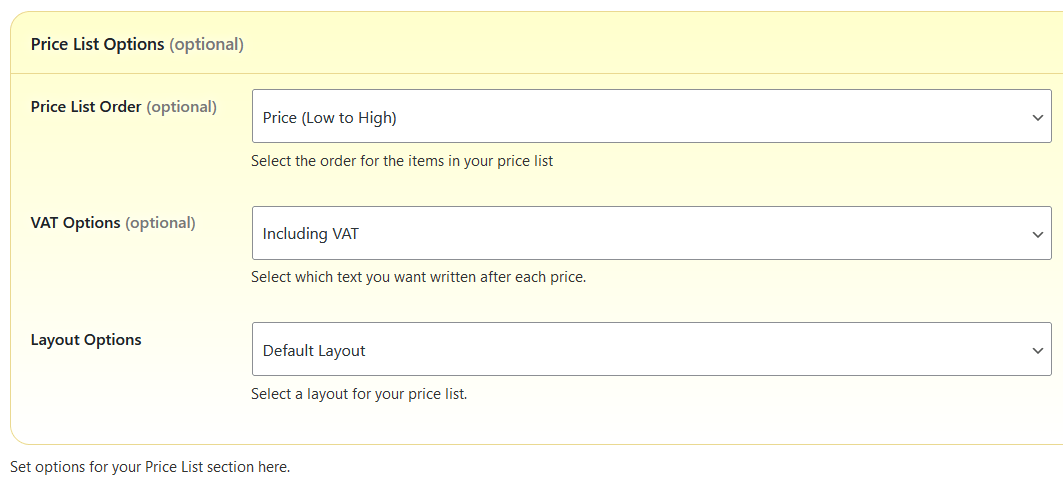
Price List Settings

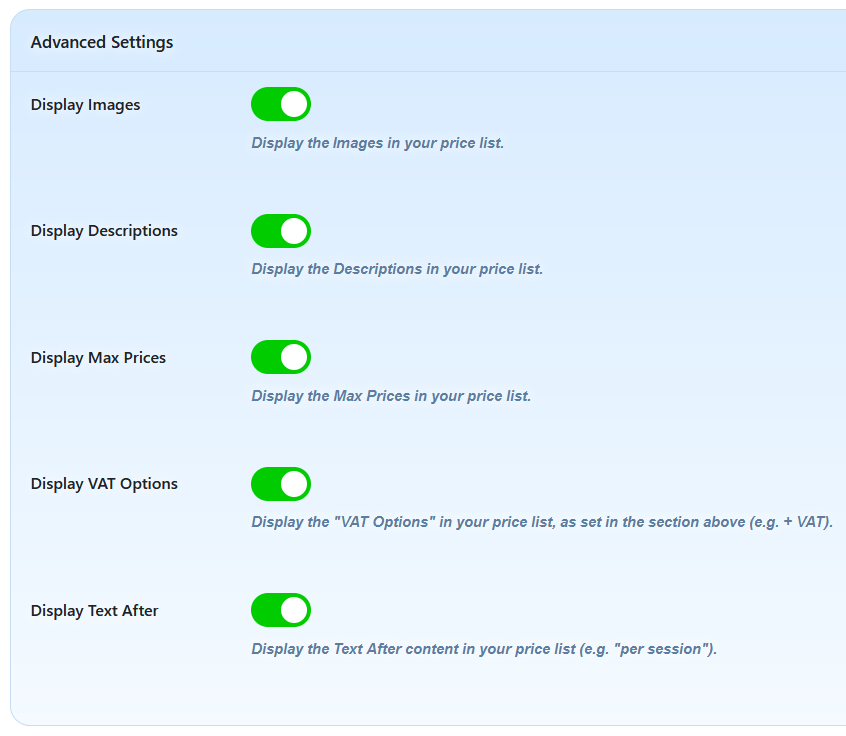
You can also adjust the following settings:

  • Set the order your prices should appear in (Name - A to Z, Price - Low to High etc).
  • Set VAT options to display after each price (e.g. inc VAT, +VAT etc).
  • Show/Hide Price images.
  • Show/Hide Price descriptions.
  • Show/Hide Max Prices.
  • Show/Hide Price VAT Options.
  • Show/Hide Text After.
Number of Prices

You can also set the number of prices you can edit:

  • Select between 20 & 50 Prices.

These prices will only display if content is added to them - if they're blank then they won't show on your website.

Price List Screenshots

Here are some screenshots of the Price List section, so you get an idea of how it works.

Screenshot of the Price List admin sectionScreenshot of the Price List admin sectionScreenshot of the Price List admin sectionScreenshot of the Price List admin sectionScreenshot of the Price List admin sectionScreenshot of the Price List admin section
×
Staff Profiles
Staff Profiles

The Staff Profiles section enables you to feature information about the people who work at your company.

Here's a summary of the items you can change in your Staff Profiles section.

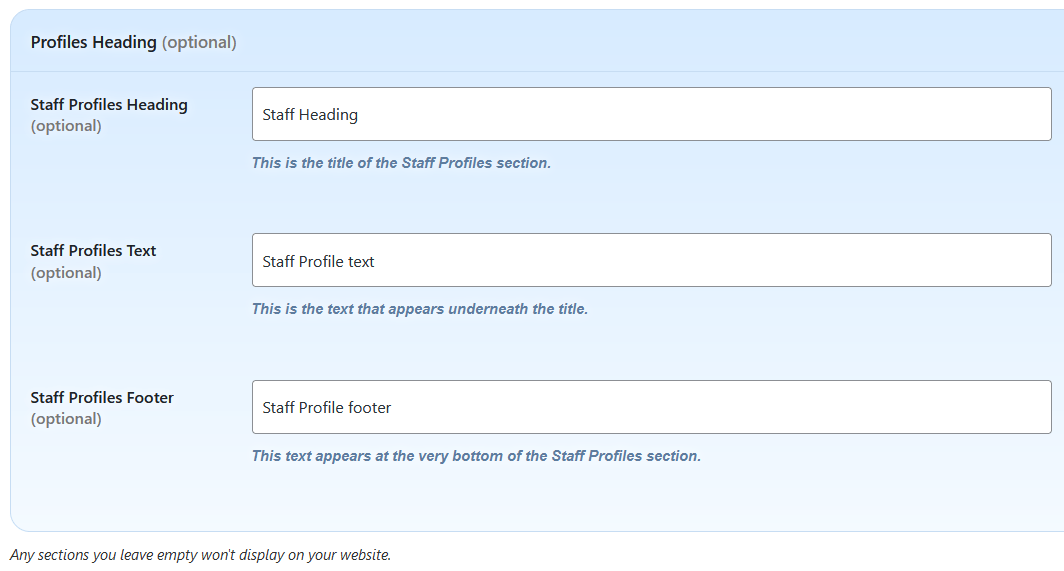
Staff Profiles Headings

For the Staff Profiles section you can:

  • Add/Edit a main "Staff Profiles" Title (e.g. "Meet The Team").
  • Add/Edit text underneath this Title (e.g. "The awesome people that run our company!").
  • Add/Edit text at the bottom of the Staff Profiles Section (e.g. "Want to join us? Get in touch!").
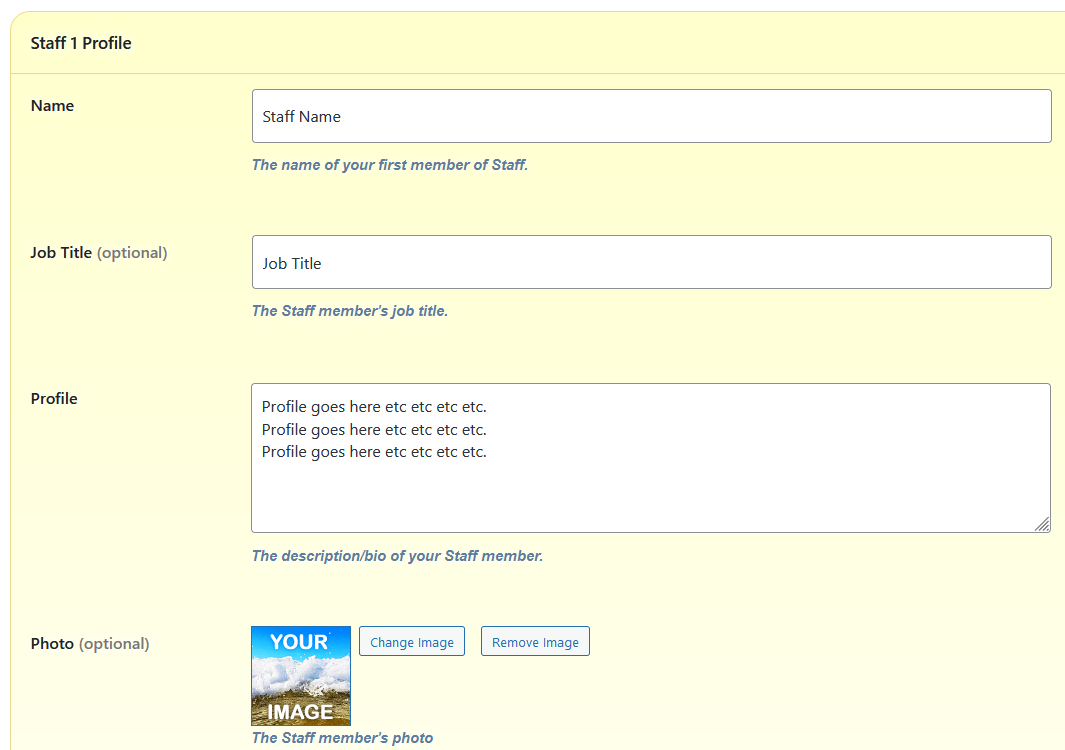
Staff Members

For each staff member in this section you can:

  • Edit their Name (e.g. "Joe Bloggs").
  • Edit their Job Title (e.g. "Web Designer").
  • Edit their Profile text (e.g. Some text about them).
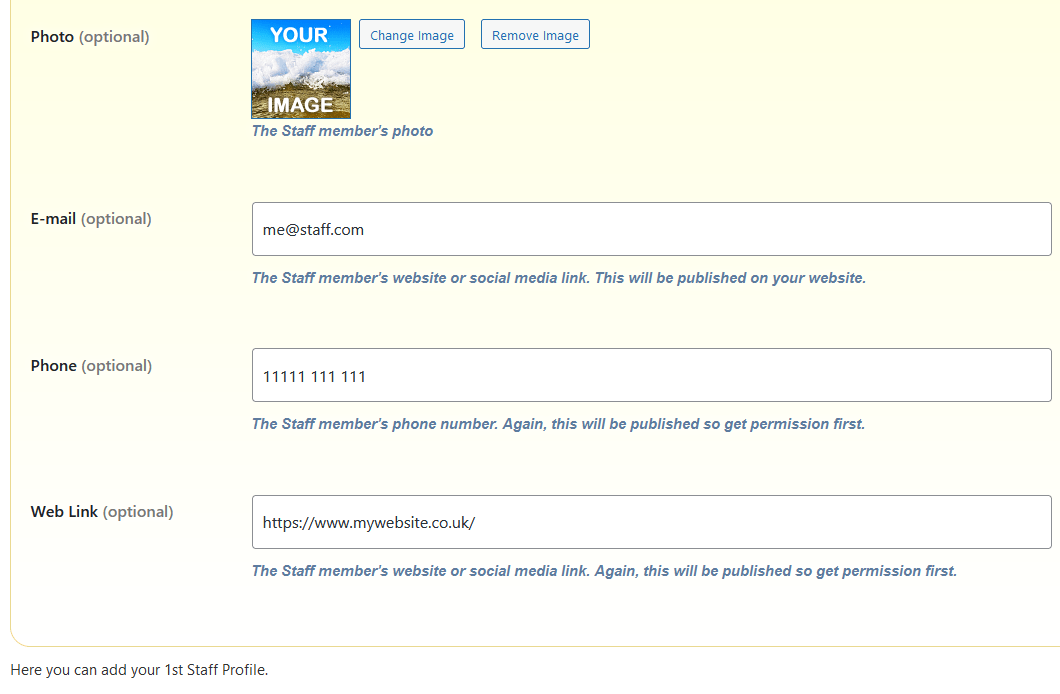
  • Add/Remove their Photo.
  • Add/Remove their E-mail address.
  • Add/Remove their Phone Number.
  • Add/Remove their Web Address / Social Media link.
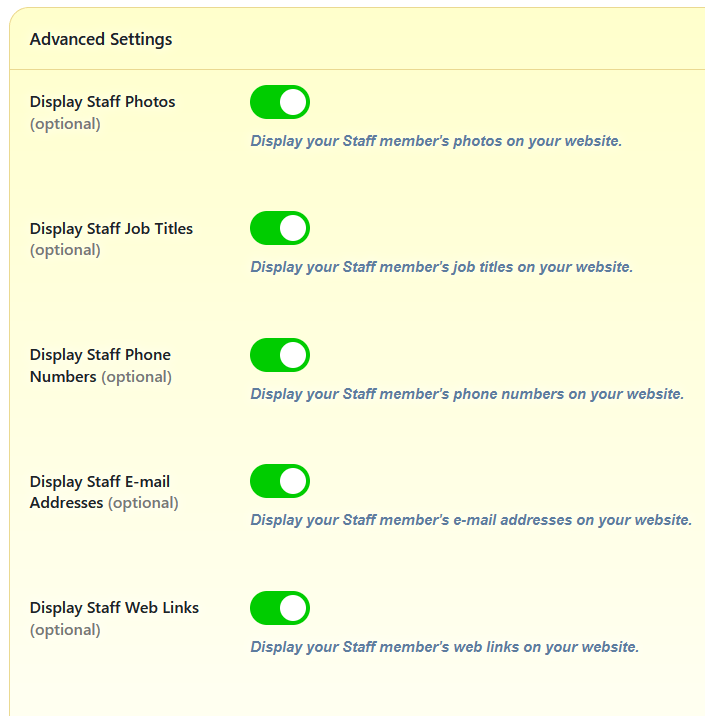
Staff Profiles Settings

You can also adjust the following settings:

  • Show/Hide all staff photos.
  • Show/Hide all staff job titles.
  • Show/Hide all staff phone numbers.
  • Show/Hide all staff e-mail addresses.
  • Show/Hide all staff web links.
  • Show/Hide slider arrows.
  • Show/Hide slider navigation.
Number of Staff Profiles

You can also set the number of staff profiles you can edit:

  • Select between 10 & 25 Staff Profiles.

Each profile will only display if content is added to them - if they're blank then they won't show on your website.

Staff Profiles Screenshots

Here are some screenshots of the Staff Profiles section, so you get an idea of how it works.
Screenshot of the Staff Profiles admin sectionScreenshot of the Staff Profiles admin sectionScreenshot of the Staff Profiles admin sectionScreenshot of the Staff Profiles admin sectionScreenshot of the Staff Profiles admin section
×
Latest News
Latest News

The News section enables you to publish your company's latest news items.

Here's a summary of the items you can change in your News section.

News Headings

For the News section you can:

  • Add/Edit a main "News" Title (e.g. "Latest News").
  • Add/Edit text underneath this Title (e.g. "A few details about what we've been up to.").
  • Add/Edit text at the bottom of the News Section (e.g. "More coming soon!").
News Items

For each news item you can:

  • Edit the News Headine (e.g. "We've Moved!").
  • Edit the News Story (e.g. "We've moved to larger premises etc...").
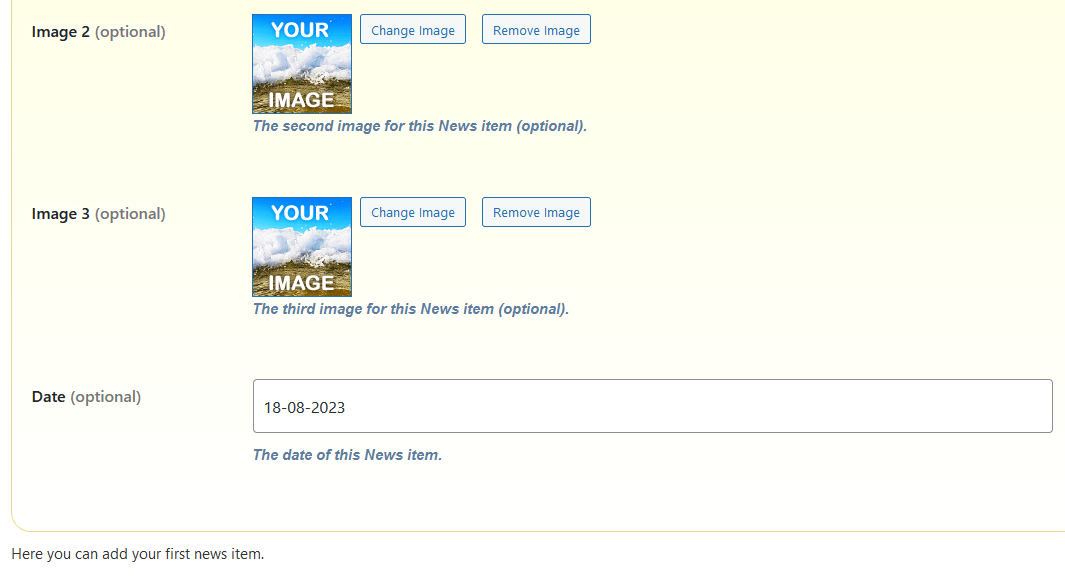
  • Add/Remove up to 3 images.
  • Edit the Date of the news item (e.g. When this News item was published).

News items are displayed on your website from newest to oldest.

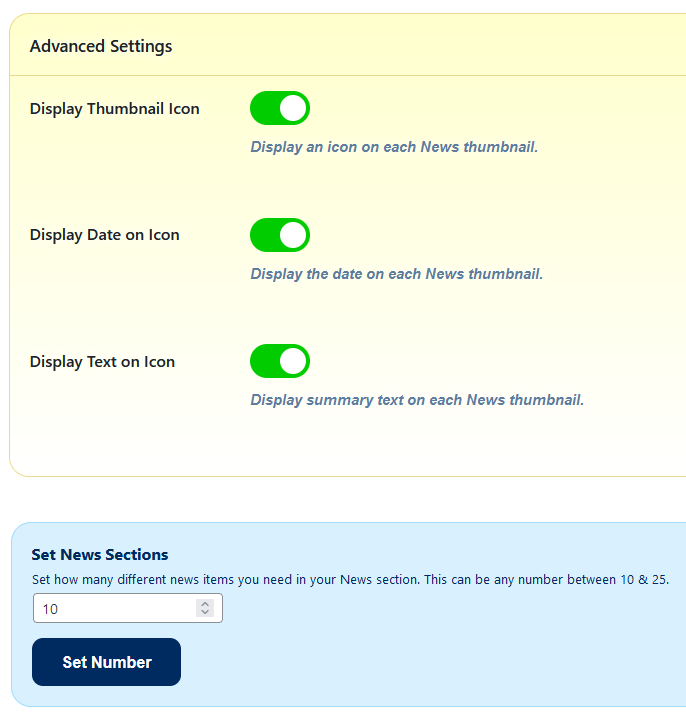
News Settings

You can also adjust the following settings:

  • Show/Hide thumbnail images.
  • Show/Hide icons on the thumbnail images.
  • Show/Hide an excerpt of the news item on the thumbnail images.
Number of News Items

You can also set the number of news items you can edit:

  • Select between 10 & 25 items.

These news items will only display if content is added to them - if they're blank then they won't show on your website.

News Screenshots

Here are some screenshots of the News section, so you get an idea of how it works.
Screenshot of the News admin sectionScreenshot of the News admin sectionScreenshot of the News admin sectionScreenshot of the News admin section
×
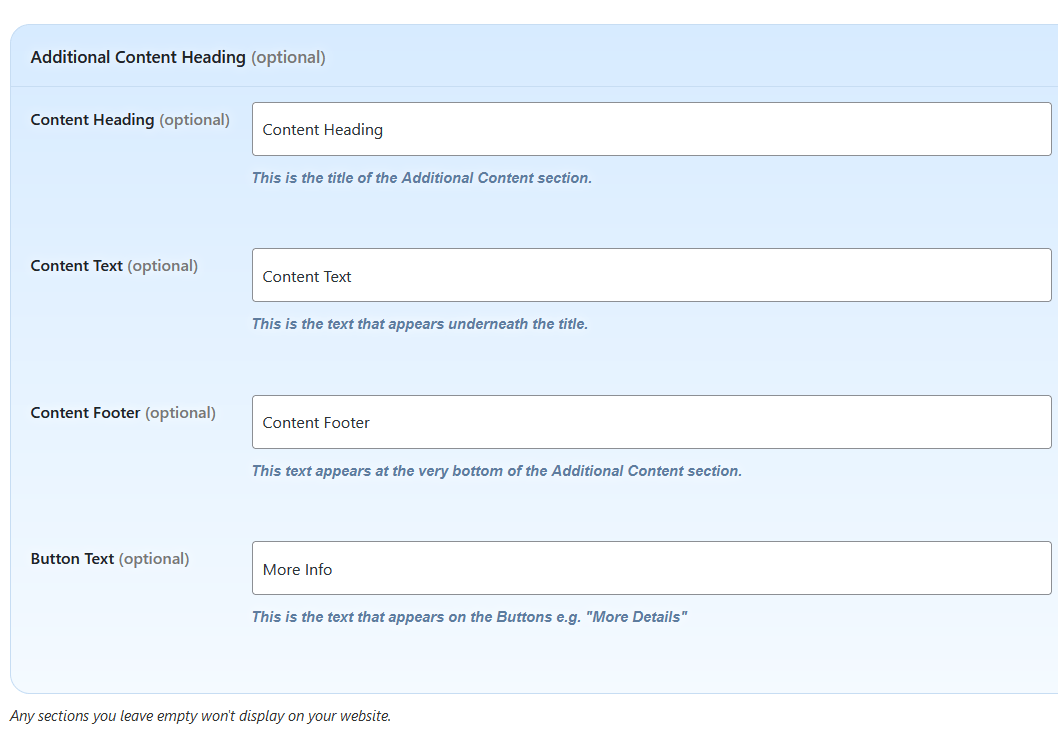
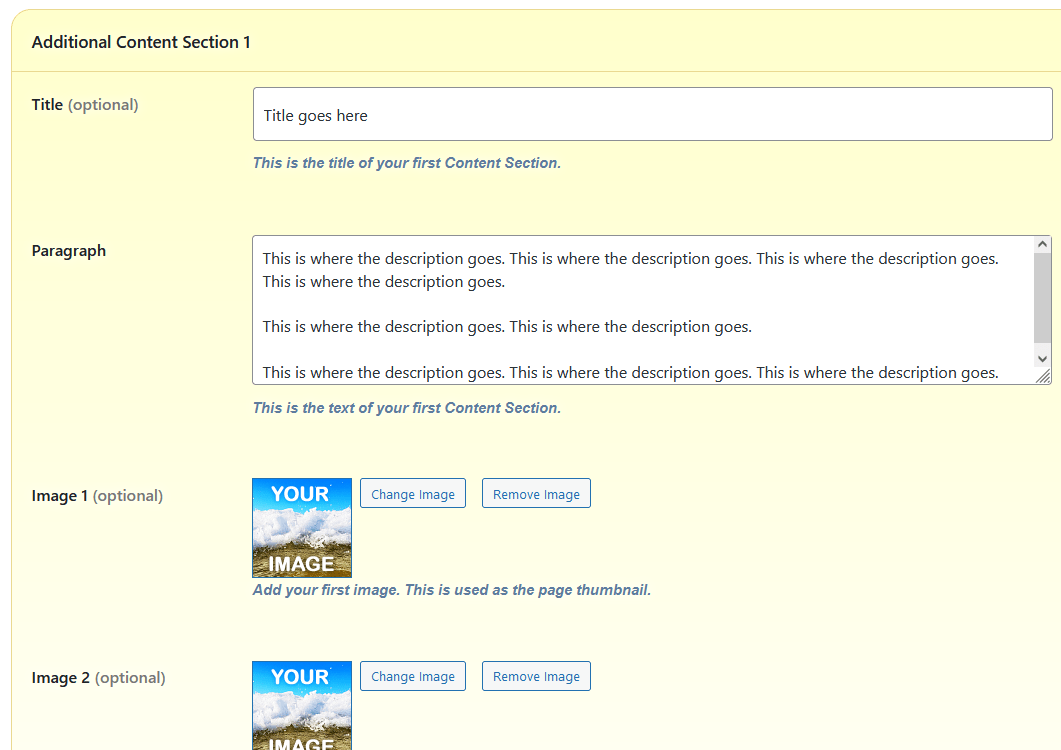
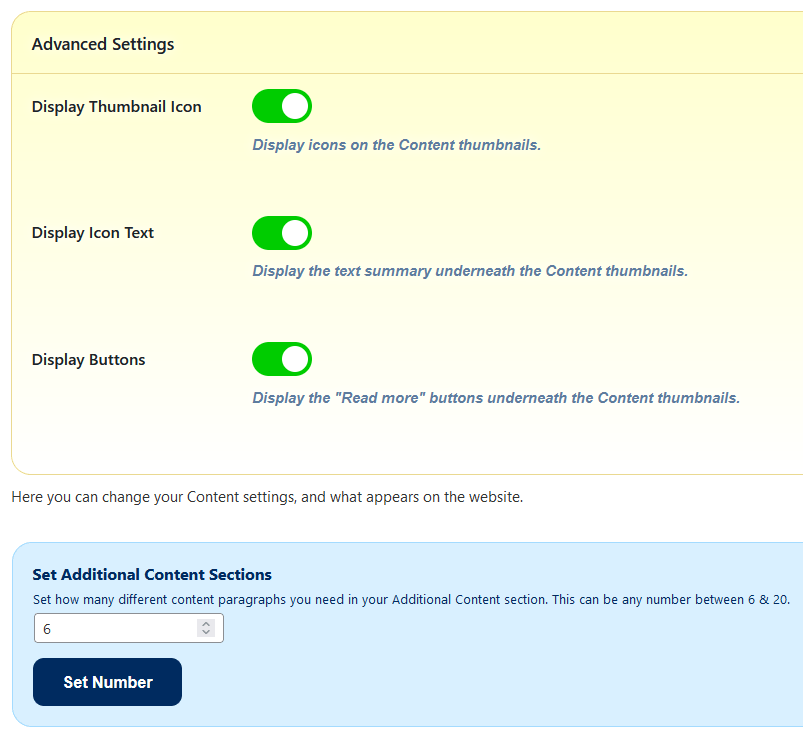
Additional Content
Additional Content

The Additional Content section enables you to include some extra content, if required.

Essentially it's a spare section designed to add any additional content that doesn't fit in any of the other sections.

Here's a summary of the items you can change in your Additional Content section.

Additional Content Headings

For the Additional Content section you can:

  • Add/Edit a main "Additional Content" Title.
  • Add/Edit text underneath this Title (e.g. "More About Our Company!").
  • Add/Edit text at the bottom of the Additional Content Section (e.g. "Here's some more info about what we do.").
  • Add/Edit the button text for each item (e.g. "Read More").
Additional Content items

For each item in this section you can:

  • Edit the Content Title (e.g. "Our History").
  • Edit the Content Text (e.g. "We began in 2015 etc..").
  • Add/Remove up to 3 images.
Additional Content Settings

You can also adjust the following settings:

  • Show/Hide icons on the thumbnails.
  • Show/Hide an excerpt of the text underneath the thumbnails.
  • Show/Hide the "Read More" buttons.
Number of Content Items

You can also set the number of Content items you can edit:

  • Select between 6 & 20 Content items.

These items will only display if content is added to them - if they're blank then they won't show on your website.

Additional Content Screenshots

Here are some screenshots of the Additional Content section, so you get an idea of how it works.

Screenshot of the Additional Content admin sectionScreenshot of the Additional Content admin sectionScreenshot of the Additional Content admin section
×
Testimonials
Testimonials

The Testimonials section enables you to include testimonials or reviews from your customers.

Here's a summary of the items you can change in your Testimonials section.

Testimonials Headings

For the Testimonials section you can:

  • Add/Edit a main "Testimonials" Title (e.g. "Testimonials").
  • Add/Edit text underneath this Title (e.g. "What our customers say about us:").
  • Add/Edit text at the bottom of the Testimonials Section (e.g. "Want us to work for you? Get in touch!").
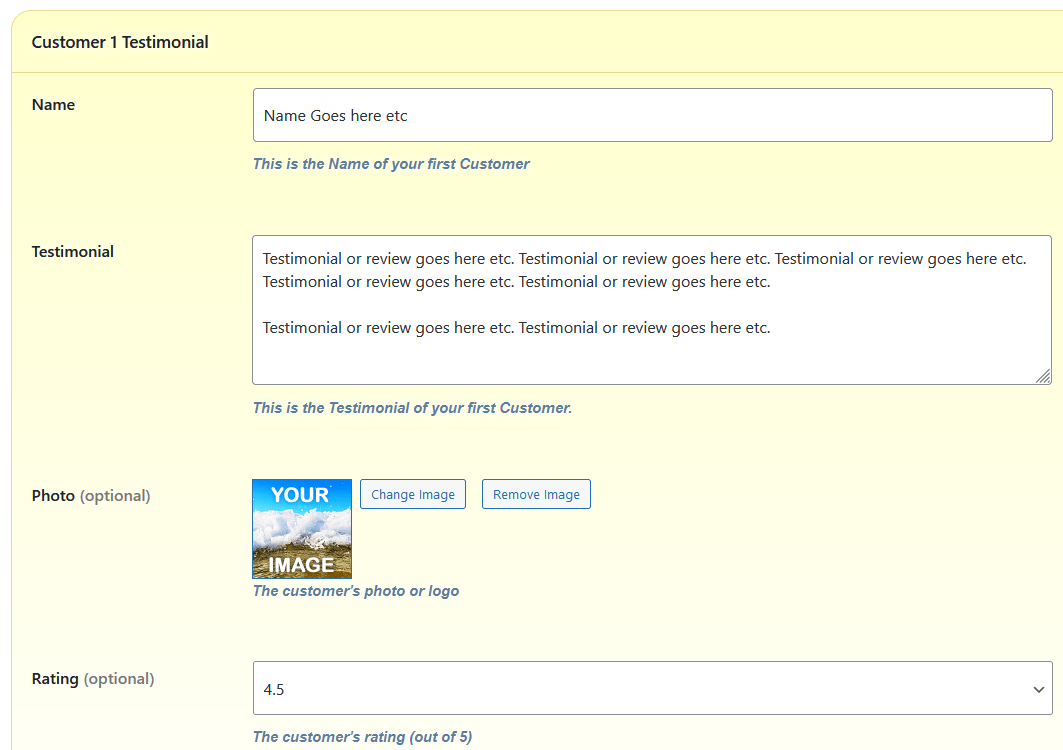
Testimonials

For each testimonial you can:

  • Edit the Customer's Name (e.g. "Company XYZ" or "Joe Bloggs").
  • Edit the Customer's Testimonial (e.g. "We were very happy with the service etc...").
  • Add/Remove an image (e.g. their logo or photo).
  • Add/Remove a rating out of 5 (e.g. 4.5 out of 5).
  • Add/Remove a link to their website (e.g. "https://www.customerswebsite.co.uk").
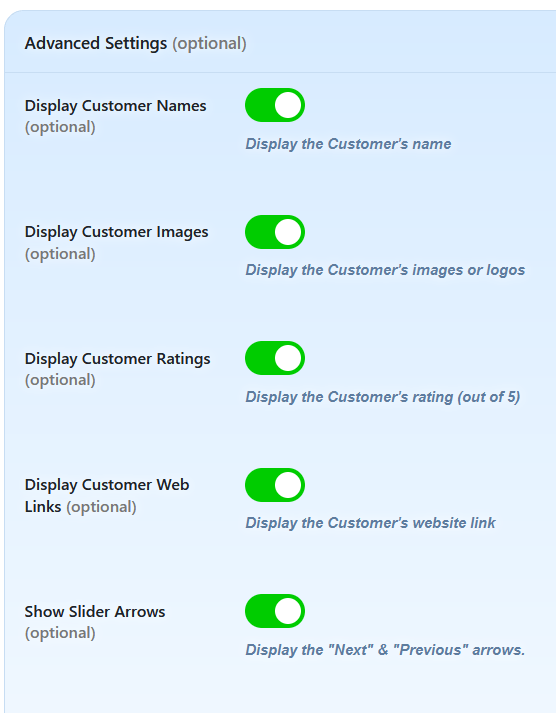
Testimonials Settings

You can also adjust the following settings:

  • Show/Hide the Customer's names.
  • Show/Hide the Customer's image or logo.
  • Show/Hide the Customer's rating.
  • Show/Hide the Customer's website link.
  • Show/Hide the Slider Arrows.
  • Show/Hide the Slider Navigation.
Number of Testimonials

You can also set the number of testimonials you can edit:

  • Select between 10 & 30 items.

These testimonials will only display if content is added to them - if they're blank then they won't show on your website.

Testimonials Screenshots

Here are some screenshots of the Testimonials section, so you get an idea of how it works.

Screenshot of the Testimonials admin sectionScreenshot of the Testimonials admin sectionScreenshot of the Testimonials admin section
×
Frequently Asked Questions
FAQs

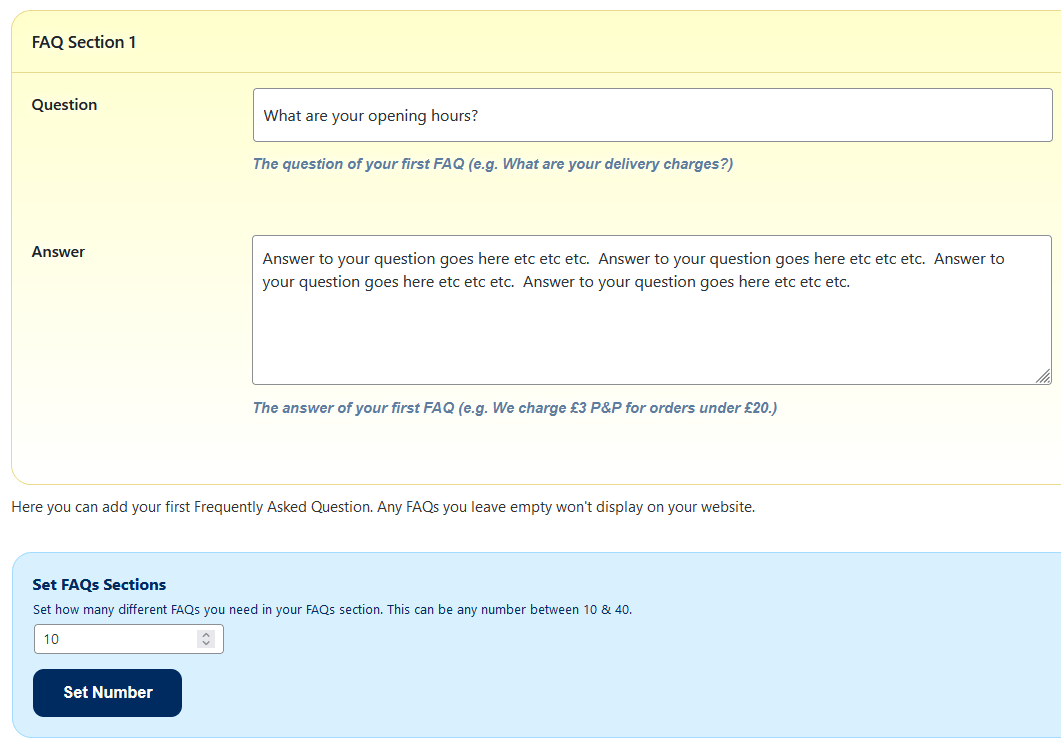
The FAQs (Frequently Asked Questions) section enables you answer the questions your visitors are most likely to ask.

Here's a summary of the items you can change in your FAQs section.

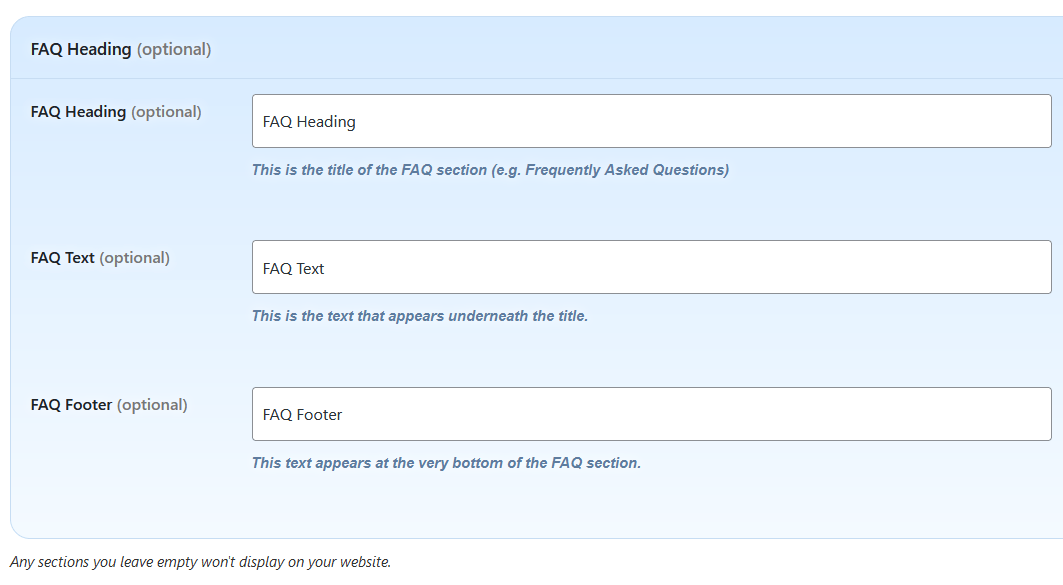
FAQs Headings

For the FAQs section you can:

  • Add/Edit a main "FAQs" Title (e.g. "FAQs").
  • Add/Edit text underneath this Title (e.g. "A few Frequently Asked Questions").
  • Add/Edit text at the bottom of the FAQs Section (e.g. "Got any more questions? Let us know!").
FAQs

For each question in this section you can:

  • Add/Edit a Question (e.g. "What are your delivery charges?").
  • Add/Edit the Answer (e.g. "We charge £4 flat rate for UK addresses.").
Number of FAQs

You can also set the number of questions you can edit:

  • Select between 10 & 40 FAQs.

These questions & answers will only display if content is added to them - if they're blank then they won't show on your website.

FAQs Screenshots

Here are some screenshots of the FAQs section, so you get an idea of how it works.

Screenshot of the FAQs admin sectionScreenshot of the FAQs admin section
×
Events
Events

This section enables you to list any forthcoming events for your company.

Here's a summary of the items you can change in your Events section.

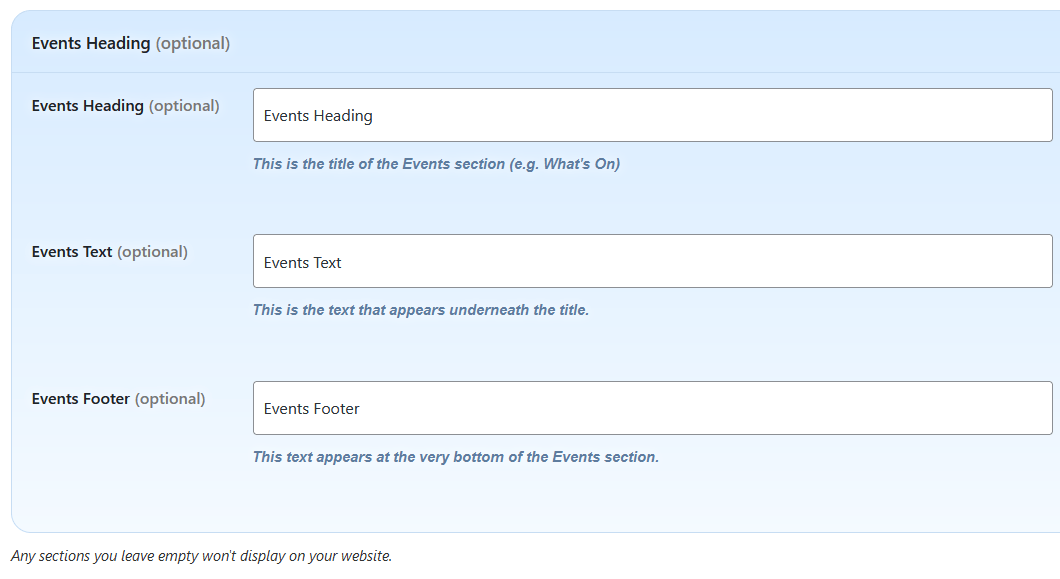
Events Headings

For the Events section you can:

  • Add/Edit a main "Events" Title (e.g. "Our Events").
  • Add/Edit text underneath this Title (e.g. "We host some amazing events throughout the year.").
  • Add/Edit text at the bottom of the Events Section (e.g. "All events are dog & family friendly.").
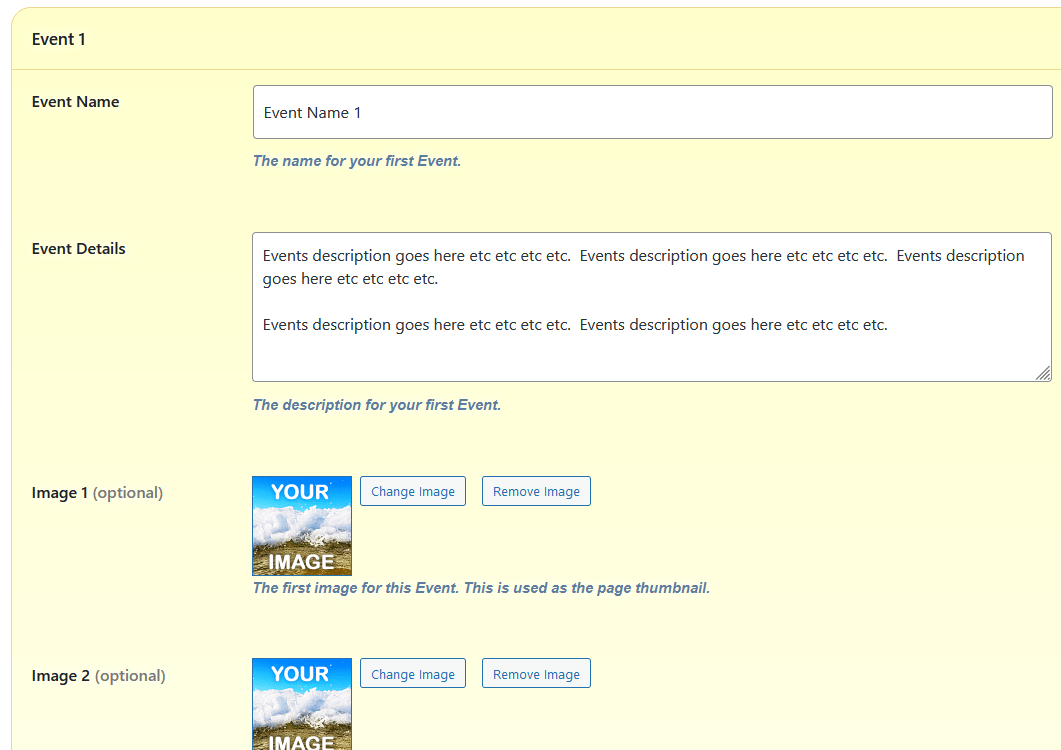
Events

For each event you can:

  • Edit the Event Name (e.g. "Charity Night").
  • Edit the Event Details (e.g. "We are raising money for a local charity etc..").
  • Add/Remove up to 3 images for this Event.
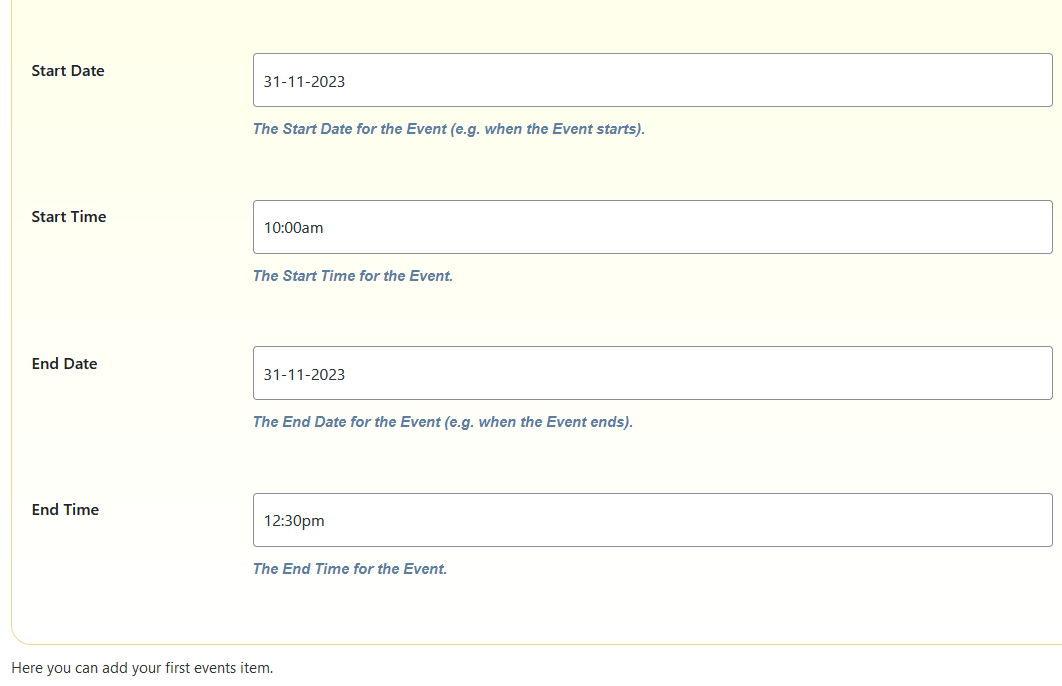
  • Edit the Event's Start Date (e.g. "12/12/26").
  • Edit the Event's Start Time (e.g. 8:00 PM) .
  • Edit the Event's End Date (e.g. "13/12/26").
  • Edit the Event's End Time (e.g. 1:00 AM).

All Events are displayed in date order, with past events displayed underneath the present & future events.

Events Settings

You can also adjust the following settings:

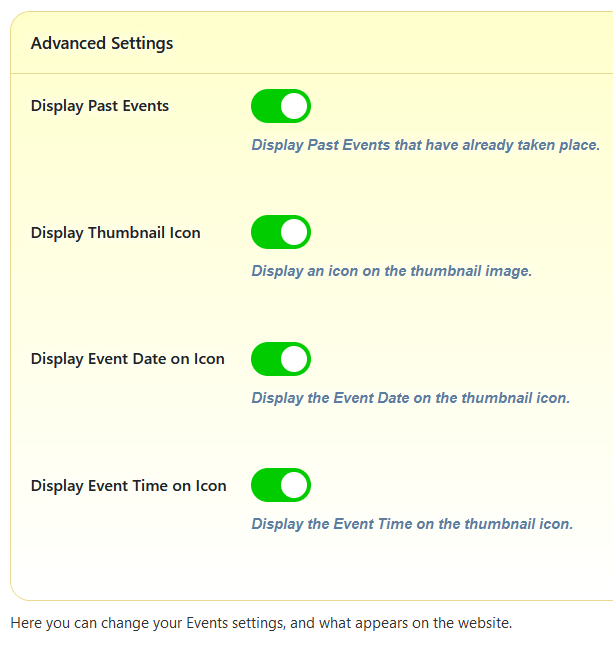
  • Show/Hide Past Events (e.g. Hide events that have already taken place).
  • Show/Hide icons on the Event thumbnails.
  • Show/Hide the Event Date on the Event thumbnails.
  • Show/Hide the Event Time on the Event thumbnails.
Number of Events

You can also set the number of events you can edit:

  • Select between 10 & 30 events.

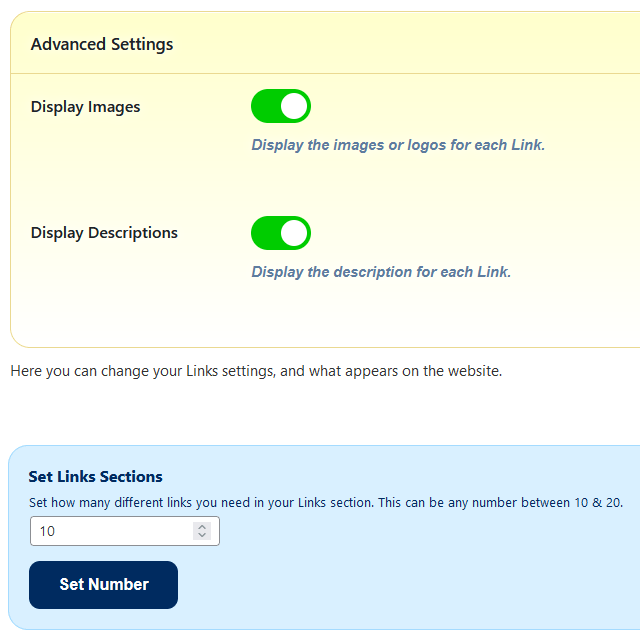
These events will only display if content is added to them - if they're blank then they won't show on your website.

Events Screenshots

Here are some screenshots of the Events section, so you get an idea of how it works.

Screenshot of the Events admin sectionScreenshot of the Events admin sectionScreenshot of the Events admin sectionScreenshot of the Events admin section
×
Downloads
Downloads

The Downloads section enables you to have files on your website (such as brochures or menus) that visitors can download.

Here's a summary of the items you can change in your Downloads section.

Downloads Headings

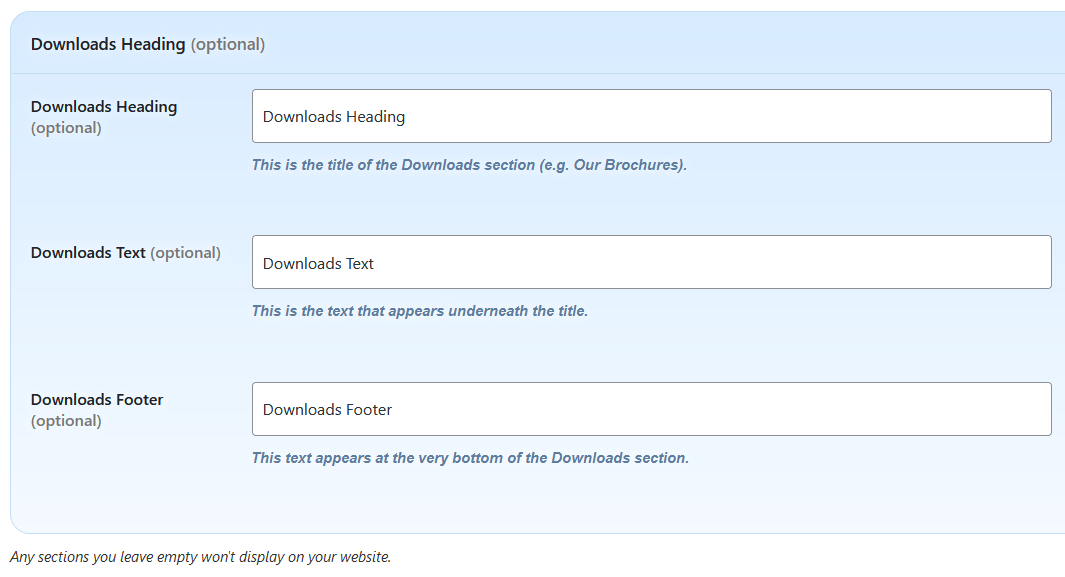
For the Downloads section you can:

  • Add/Edit a main "Downloads" Title (e.g. "Our Menus").
  • Add/Edit text underneath this Title (e.g. "Download our latest menus below.").
  • Add/Edit text at the bottom of the Downloads Section (e.g. "All files are PDFs.").
Downloads

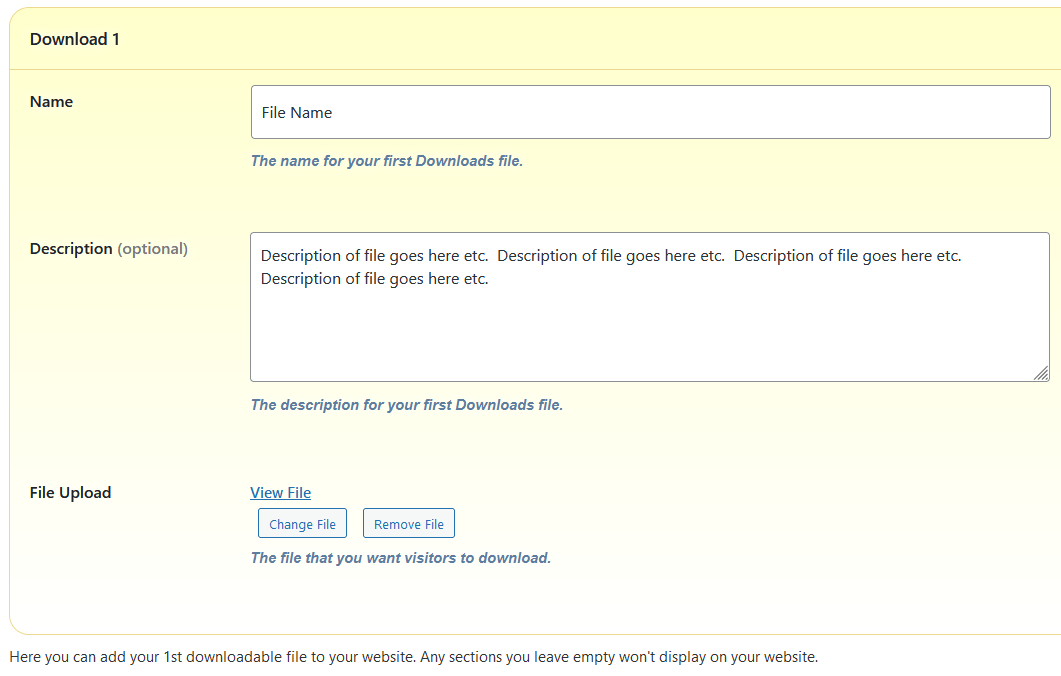
For each downloadable file you can:

  • Edit the Download's Name (e.g. Our Winter Menu).
  • Edit the Download's Description (e.g. Here's our latest winter menu).
  • Add/Remove the file.
Downloads Settings

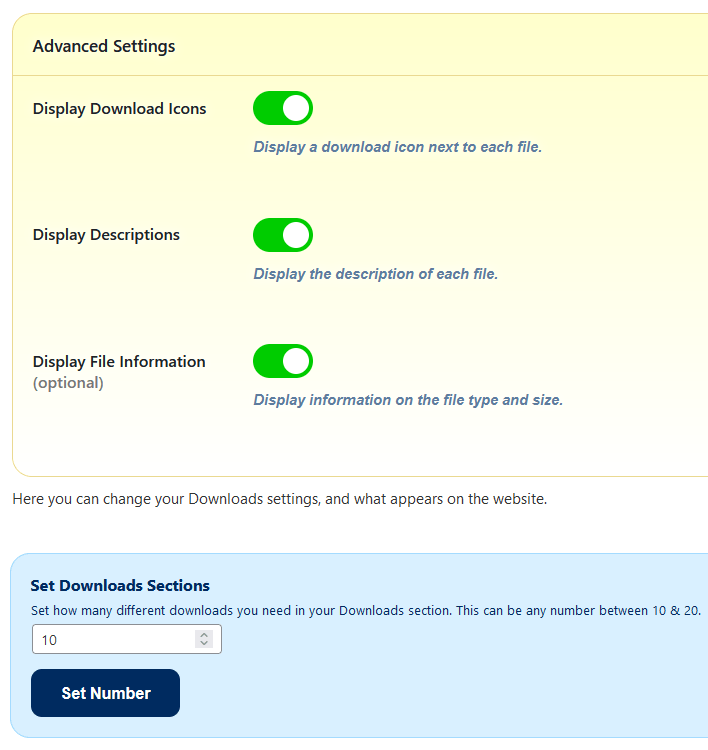
You can also adjust the following settings:

  • Show/Hide a download icon next to each file.
  • Show/Hide the download Description.
  • Show/Hide the download's File Information (File Type & File Size).
Number of Downloads

You can also set the number of downloads you can edit:

  • Select between 10 & 20 downloads.

These downloads will only display if content is added to them - if they're blank then they won't show on your website.

Downloads Screenshots

Here are some screenshots of the Downloads section, so you get an idea of how it works.

Screenshot of the Downloads admin sectionScreenshot of the Downloads admin sectionScreenshot of the Downloads admin section
×
Logos
Logos

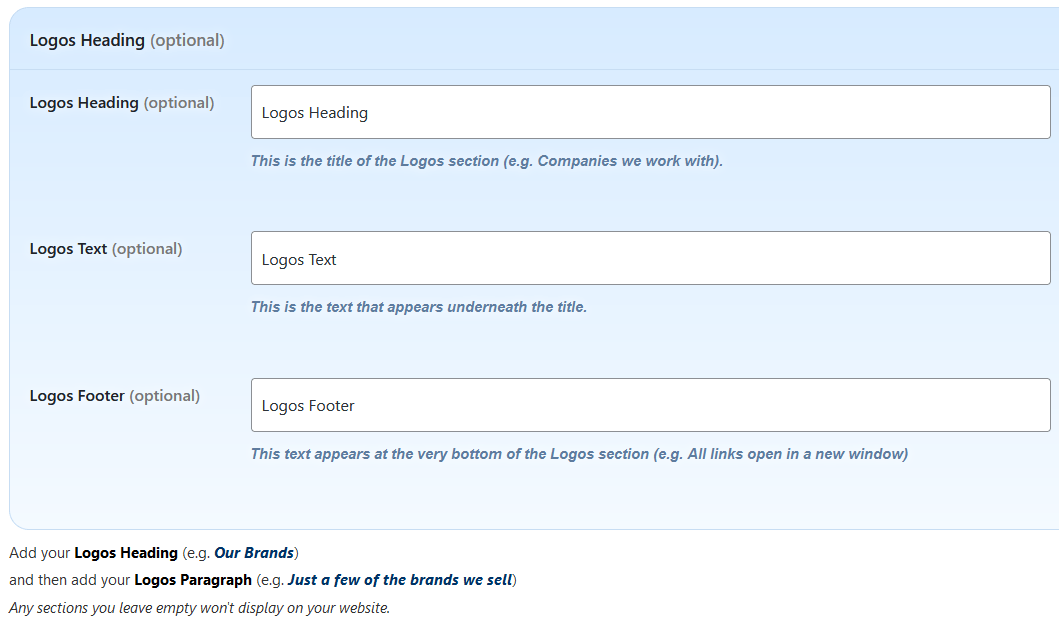
The Logos section enables you to include logos of companies or suppliers that you work with.

Here's a summary of the items you can change in your Logos section.

Logos Headings

For the Logos section you can:

  • Add/Edit a main "Logos" Title (e.g. "Companies we work with").
  • Add/Edit text underneath this Title (e.g. "We stock products from these companies.").
  • Add/Edit text at the bottom of the Logos Section (e.g. "Click on a logo to view their website.").
Logos

For each logo in this section you can:

  • Edit their Name (e.g. "Nike").
  • Add/Remove an image (e.g. Nike's logo).
  • Edit their website link (e.g. https://www.nike.com ).
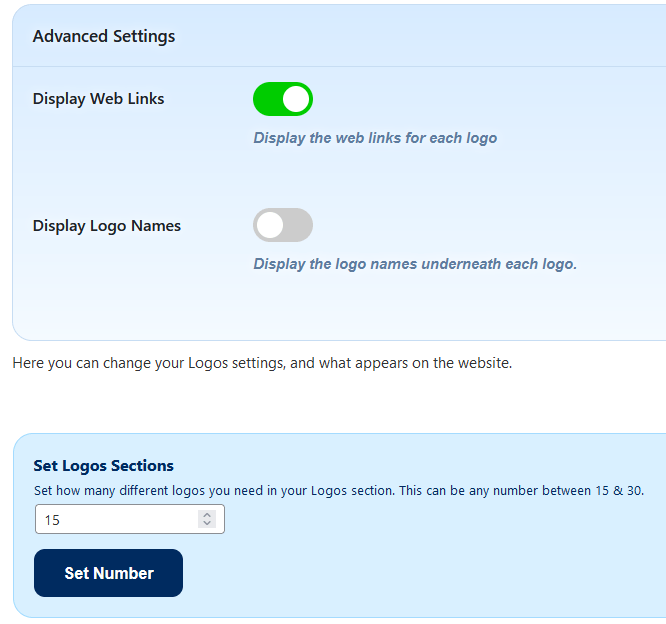
Logos Settings

You can also adjust the following settings:

  • Show/Hide their Website Links.
  • Show/Hide the Company Names underneath their logo.
Number of Logos

You can also set the number of logos you can edit:

  • Select between 15 & 30 logos.

These logos will only display if content is added to them - if they're blank then they won't show on your website.

Logos Screenshots

Here are some screenshots of the Logos section, so you get an idea of how it works.
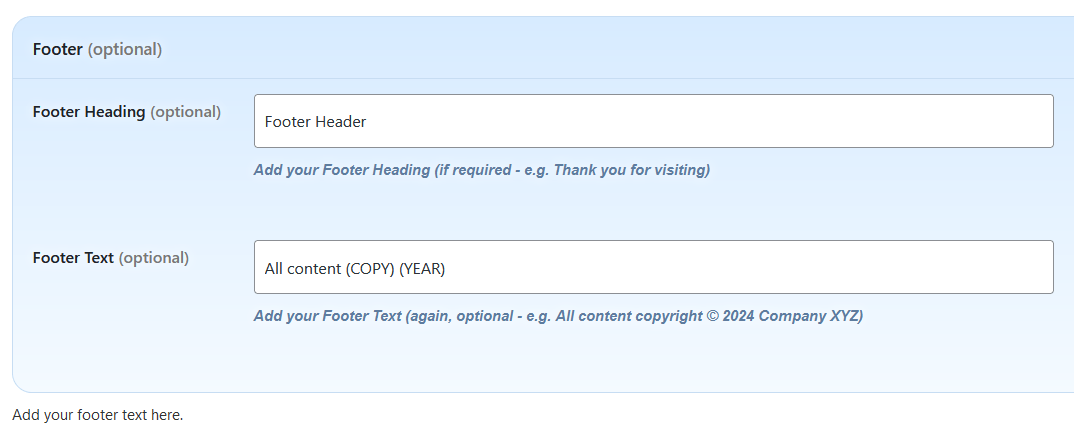
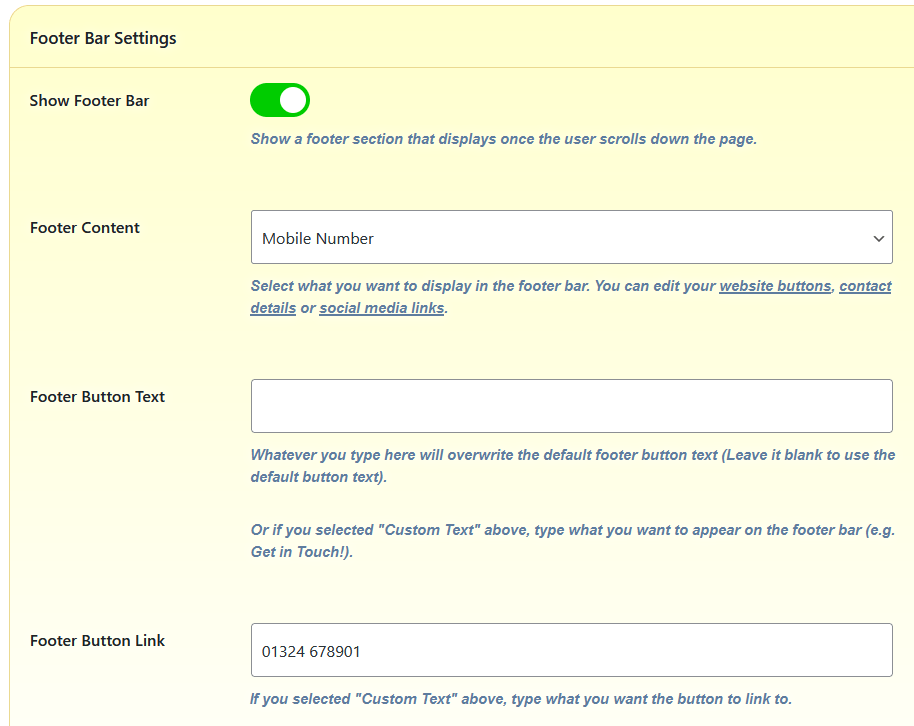
Screenshot of the Logos admin sectionScreenshot of the Logos admin sectionScreenshot of the Logos admin section
Contact Sections
×
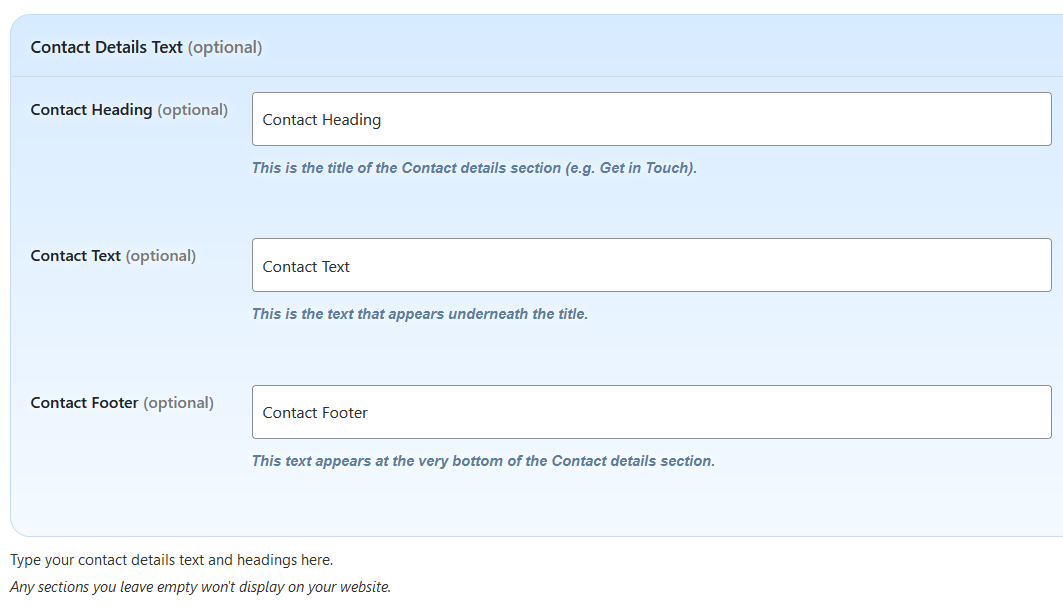
Contact Details
Contact Details

The Contact Details section enables you to add your contact details to your website.

Here's a summary of the items you can change in your Contact section.

Contact Headings

For the Contact section you can:

  • Add/Edit a main "Contact" Title (e.g. "Get in Touch!").
  • Add/Edit text underneath this Title (e.g. "Feel free to get in touch with any questions.").
  • Add/Edit text at the bottom of the Contact Section (e.g. "We answer calls & e-mails 9-5, Monday to Friday.").
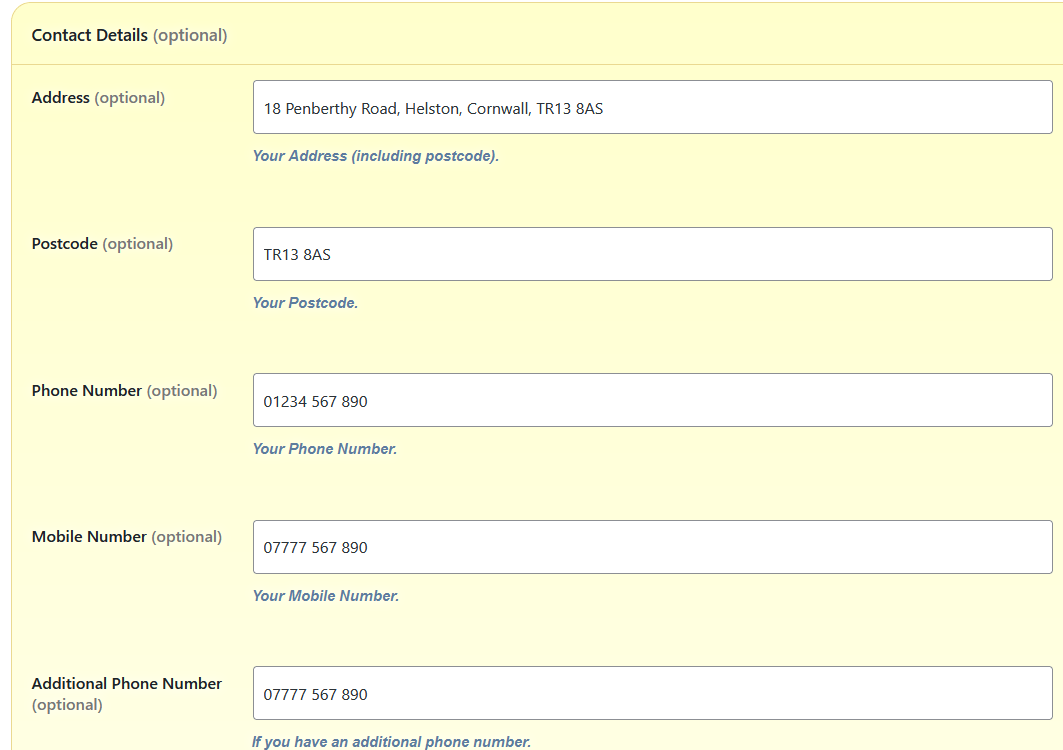
Contact Details

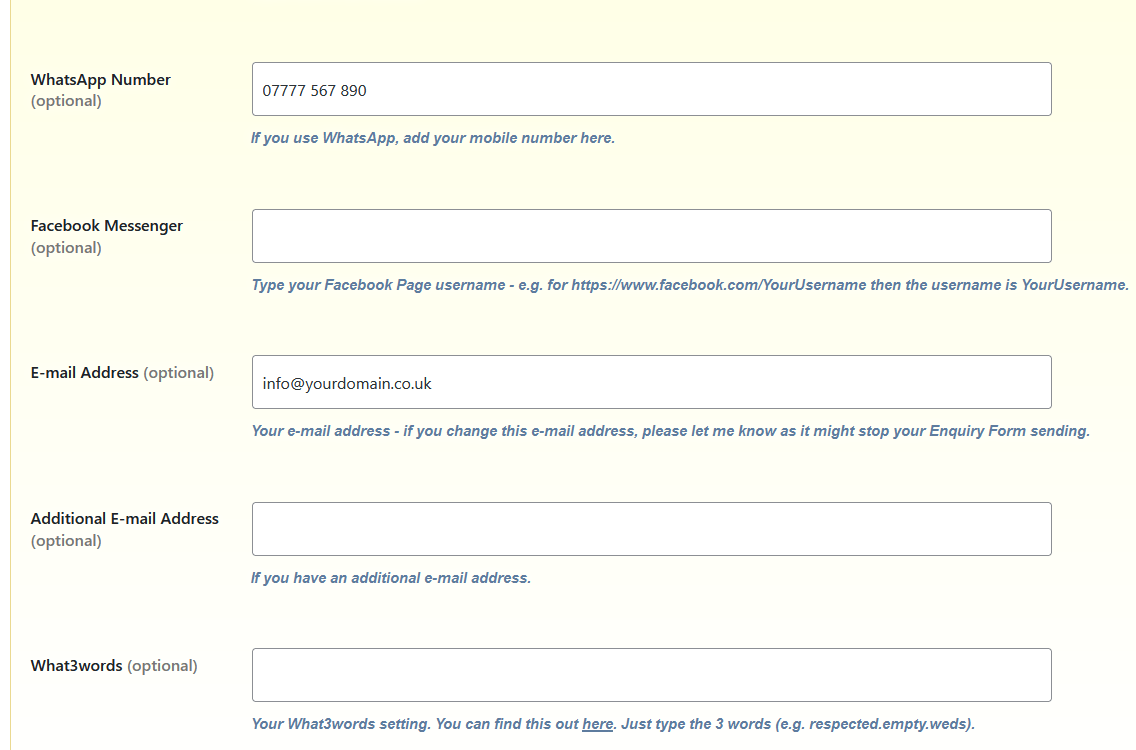
You can edit any of the following settings:

  • Address
  • Postcode
  • Phone Number
  • Mobile Number
  • Additional Phone Number
  • Fax Number
  • WhatsApp Number
  • Facebook Messenger
  • E-mail Address
  • Additional E-mail Address
  • What3words

Each item will only show on your website if content is added to them - if they're left blank then they won't be displayed.

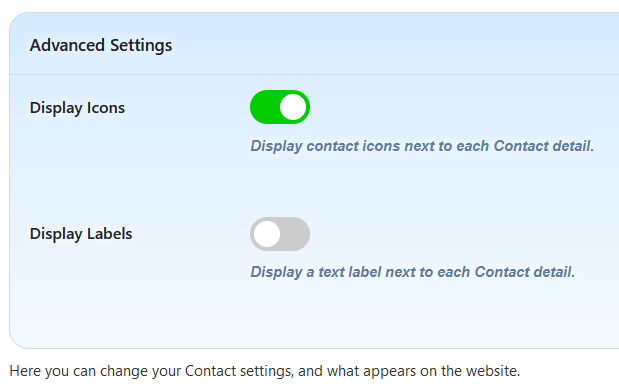
Contact Details Settings

You can also adjust the following settings:

  • Show/Hide an icon next to each contact detail.
  • Show/Hide a text label next to each contact detail (e.g. "Address: ").
Contact Details Screenshots

Here are some screenshots of the Contact section, so you get an idea of how it works.
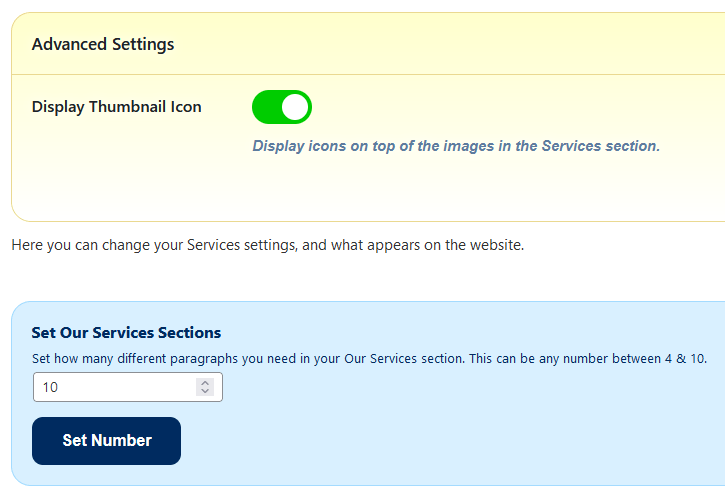
Screenshot of the Contact admin sectionScreenshot of the Contact admin sectionScreenshot of the Contact admin sectionScreenshot of the Contact admin section
×
Enquiry Form
Enquiry Form

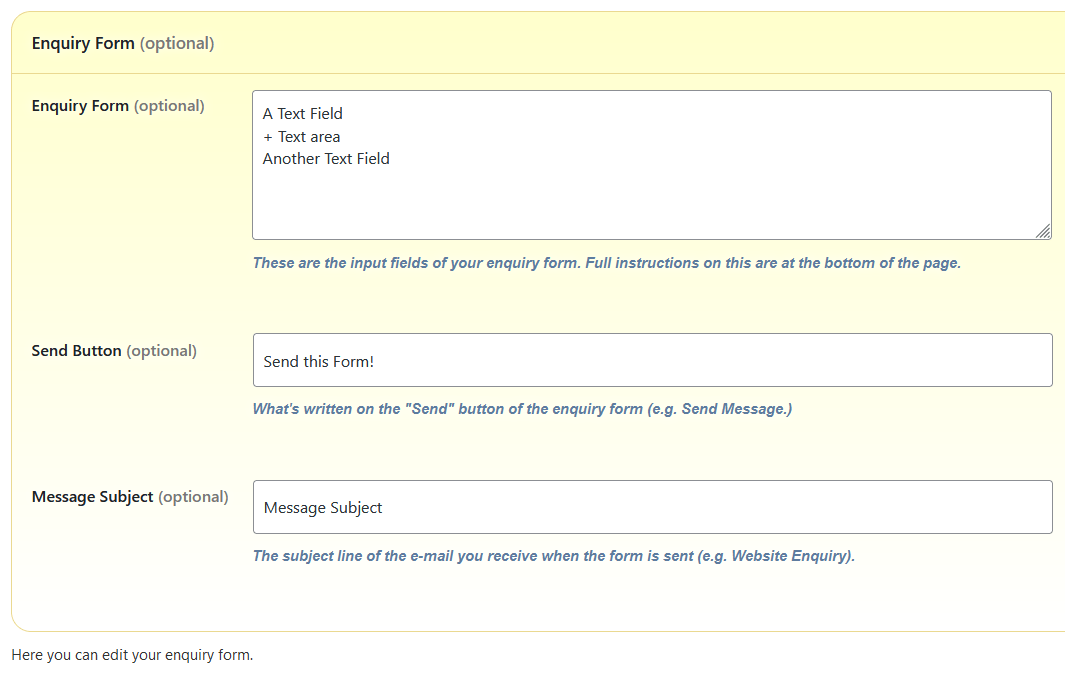
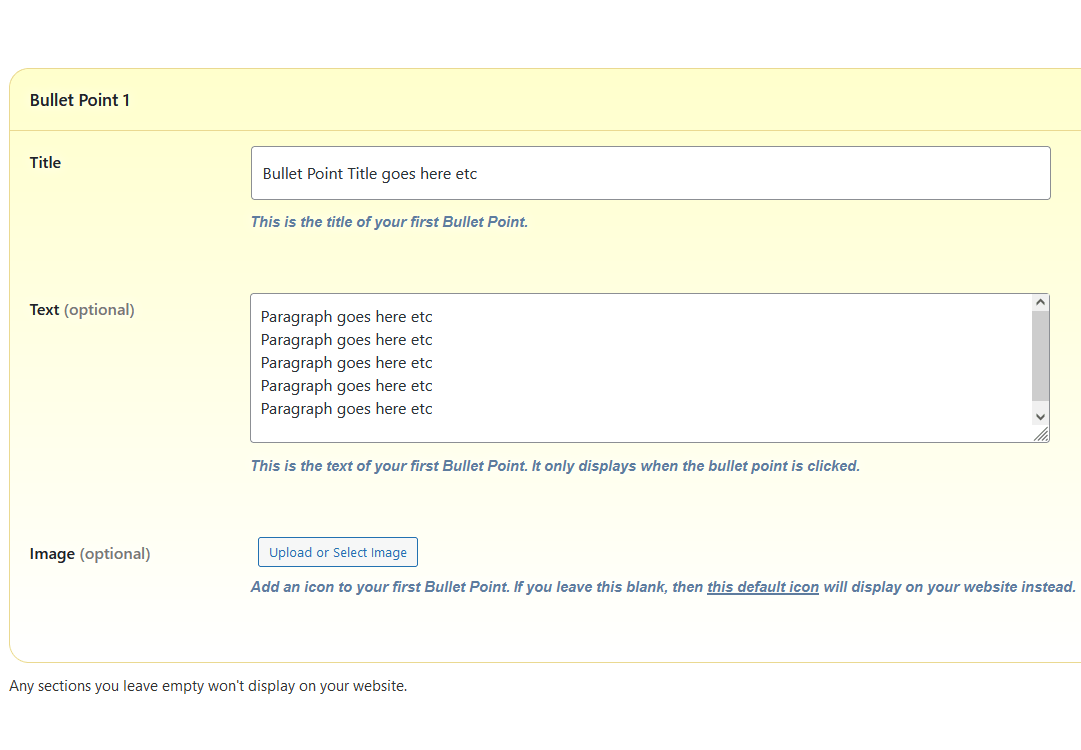
The Enquiry Form section enables you to edit the contact form on your website.

Here's a summary of the items you can change in your Enquiry Form section.

Enquiry Form Headings

For the Enquiry Form section you can:

  • Add/Edit a main "Enquiry Form" Title (e.g. "Send us a Message").
  • Add/Edit text underneath this Title (e.g. "Fill in the form below and we'll get back to you asap").
  • Add/Edit text at the bottom of the Enquiry Form Section (e.g. "We won't share your details with anyone.").
Enquiry Form

Here you can:

  • Type out the input text fields you need from your customers (e.g. "Name, Address, Phone Number, E-mail Address").
  • Specify any fields that need a larger Text Area input (e.g. "Your Enquiry").
  • Edit the Send Button text (e.g. "Send Your Enquiry!").
  • Edit the E-mail Subject text (e.g. "Website Enquiry").
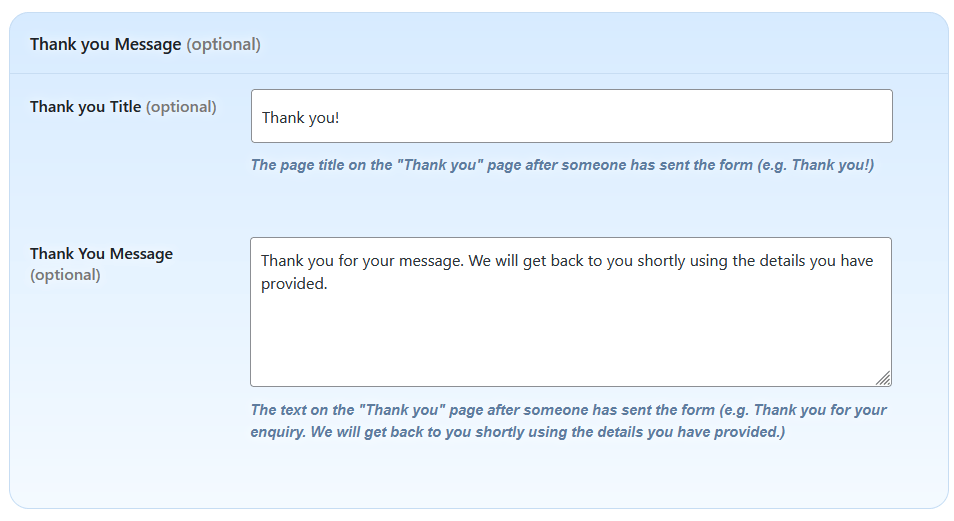
  • Edit the Thank You title upon sending the form (e.g. "Thank you for your message!").
  • Edit the Thank You message upon sending the form (e.g. "We will get back to you shortly using the details you have provided.").
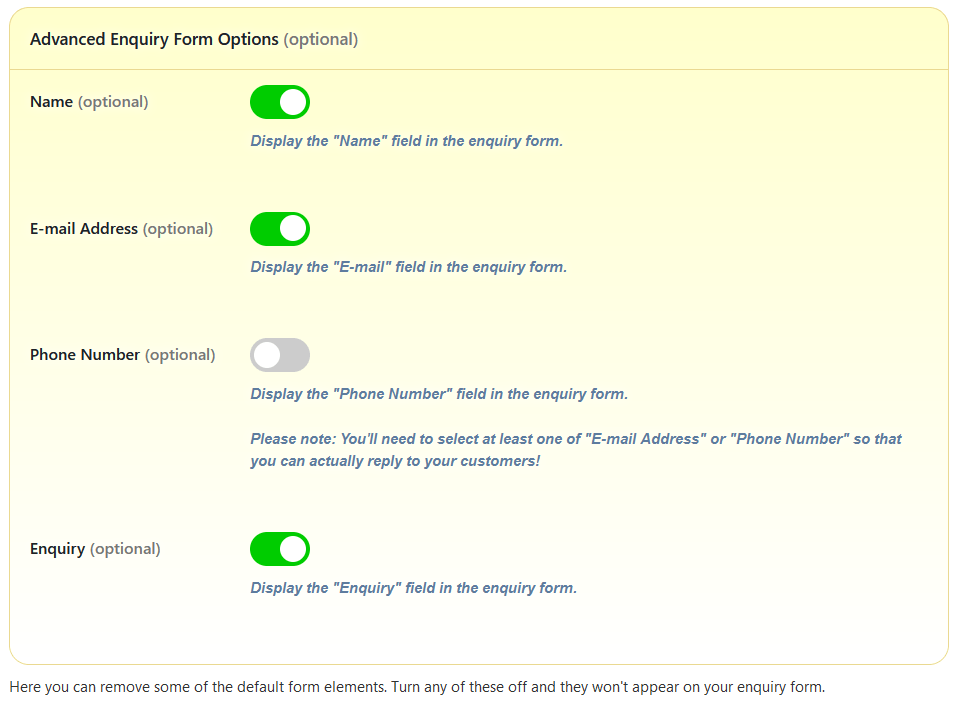
Enquiry Form Settings

You can also adjust the following settings:

  • Show/Hide the Name input field.
  • Show/Hide the E-mail Address input field.
  • Show/Hide the Phone Number input field.
  • Show/Hide the Enquiry input field.
Enquiry Form Screenshots

Here are some screenshots of the Enquiry Form section, so you get an idea of how it works.
Screenshot of the Enquiry Form admin sectionScreenshot of the Enquiry Form admin sectionScreenshot of the Enquiry Form admin sectionScreenshot of the Enquiry Form admin section
×
Google Maps
Google Maps

The Maps section enables you to add a map of where your location.

Here's a summary of the items you can change in your Maps section.

Maps Headings

For the Maps section you can:

  • Add/Edit a main "Maps" Title (e.g. "How to find us").
  • Add/Edit text underneath this Title (e.g. "We are based at the following location:").
  • Add/Edit text at the bottom of the Google Maps Section (e.g. "Here are some directions on how to find us: etc").
Google Map

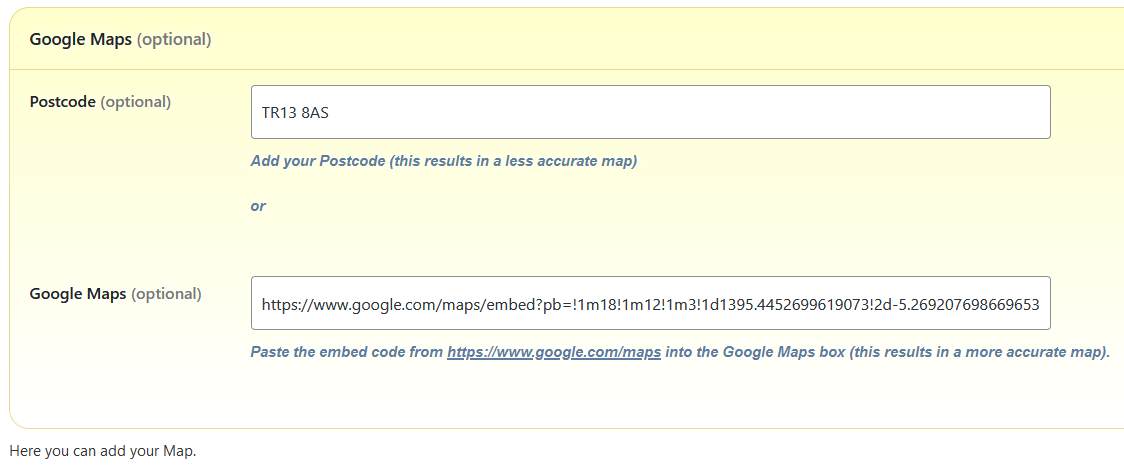
You can either:

  • Specify your Postcode (for a less accurate map).
  • Add Google Map's embed code (for a more accurate map).
Google Maps Screenshots

Here are some screenshots of the Google Maps section, so you get an idea of how it works.

Screenshot of the Google Maps admin sectionScreenshot of the Google Maps admin section
×
Social Media
Social Media Links

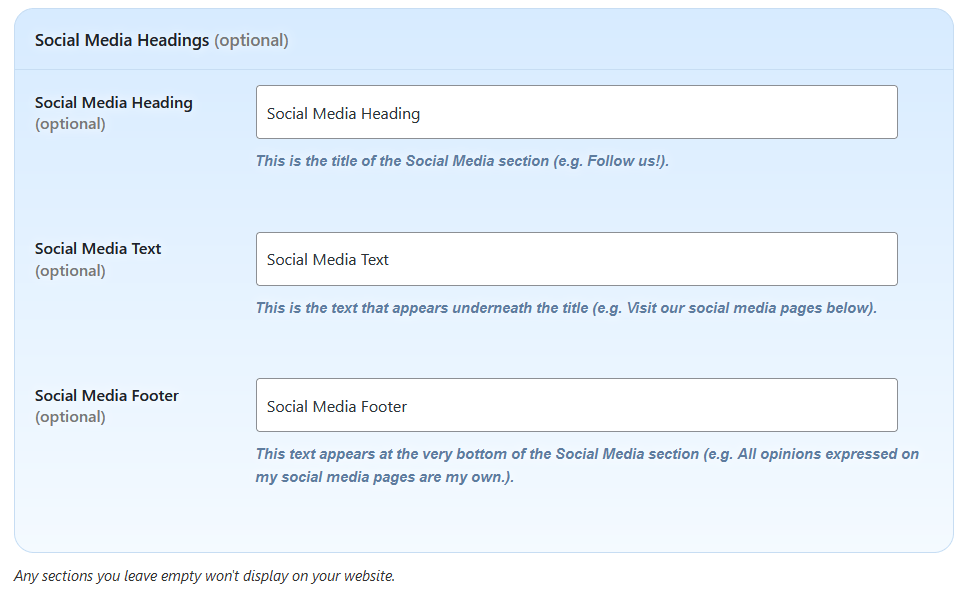
The Social Media section enables you to add links to your various social media pages.

Social Media Headings

For the Social Media section you can:

  • Add/Edit a main "Social Media" Title (e.g. "Follow us!").
  • Add/Edit text underneath this Title (e.g. "Visit our social media pages below:").
  • Add/Edit text at the bottom of the Social Media Section (e.g. "All opinions expressed on my social media pages are my own.").
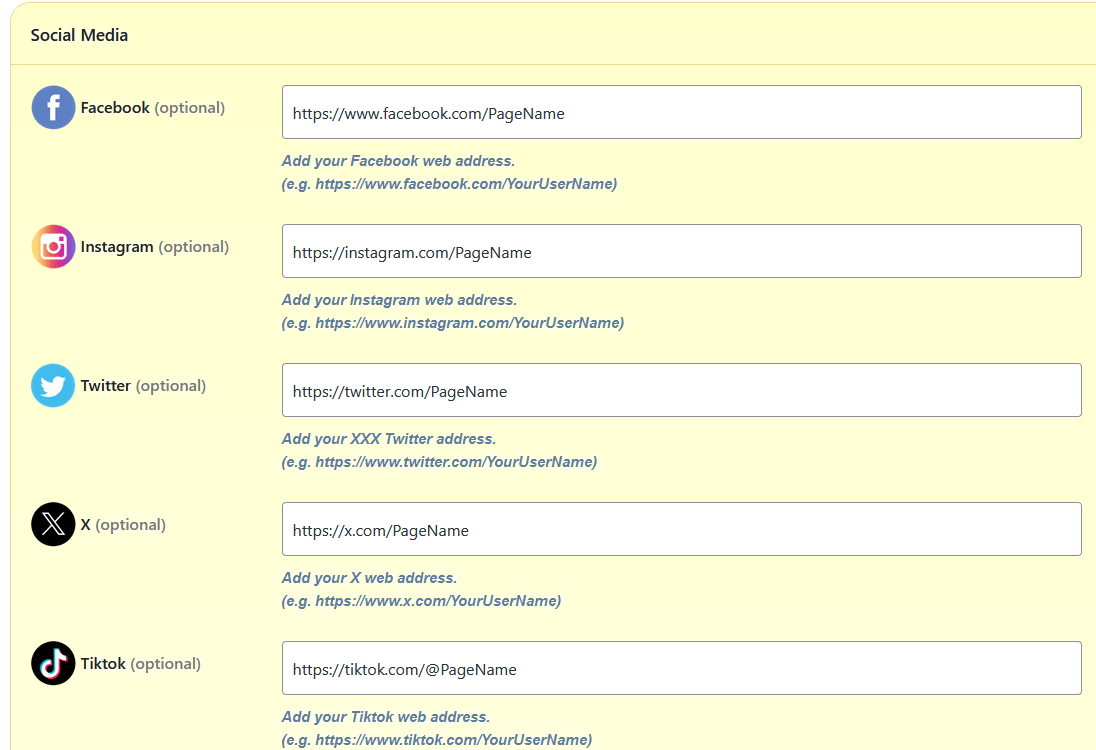
Social Media Links

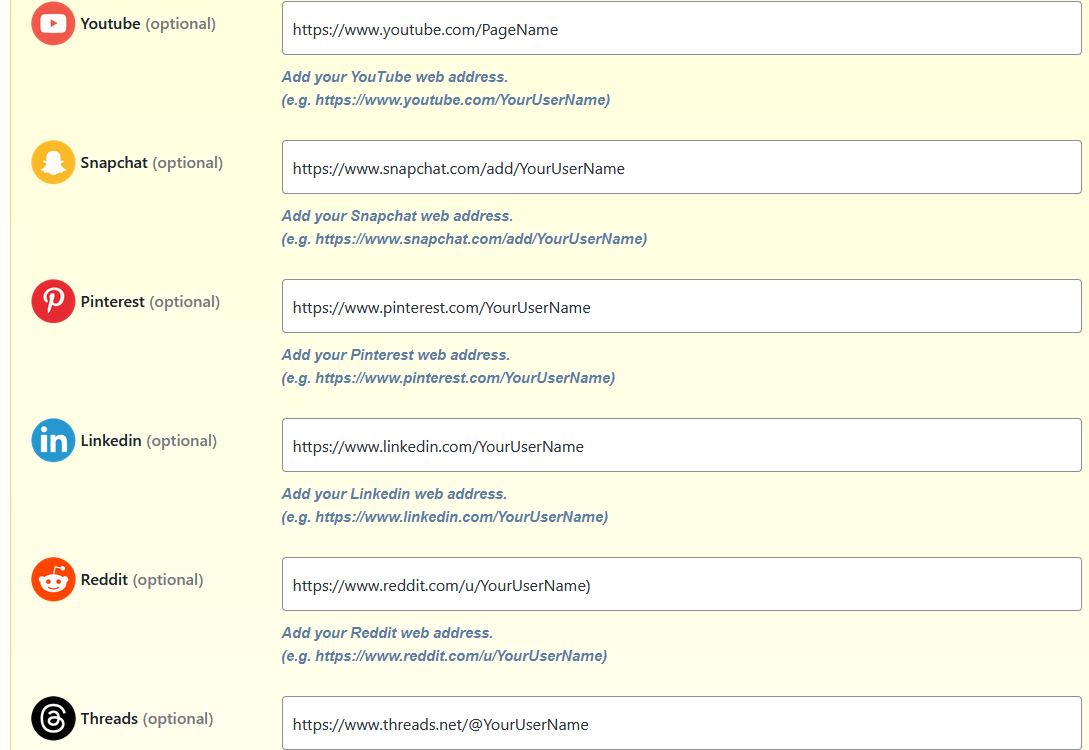
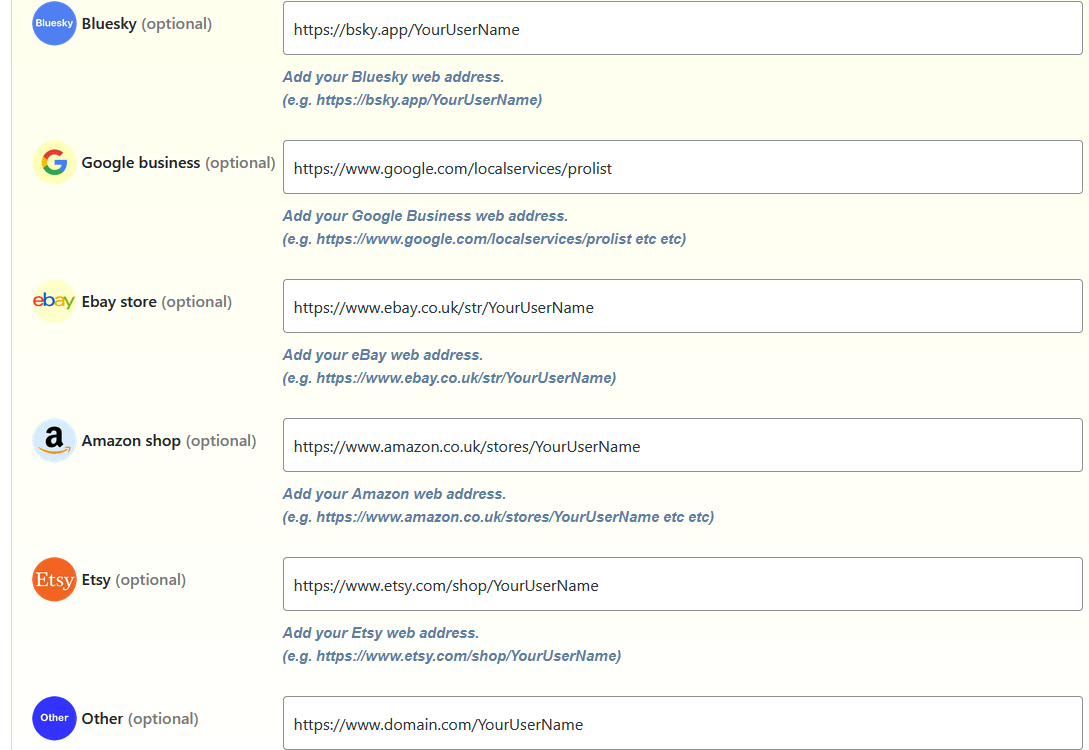
For the Social Media section you can add a link to the following platforms:

  • Facebook
  • Instagram
  • Twitter
  • X (if you prefer the newer name!)
  • Tiktok
  • Youtube
  • Snapchat
  • Pinterest
  • Linkedin
  • Reddit
  • Threads
  • Bluesky
  • Google business
  • Ebay store
  • Amazon shop
  • Etsy
  • Other (any other link)

These social media icons will only display if content is added to them - if they're blank then they won't show on your website.

Social Media Screenshots

Here are some screenshots of the Social Media section, so you get an idea of how it works.
Screenshot of the Social Media admin sectionScreenshot of the Social Media admin sectionScreenshot of the Social Media admin sectionScreenshot of the Social Media admin section
×
Contact Buttons
Contact Buttons

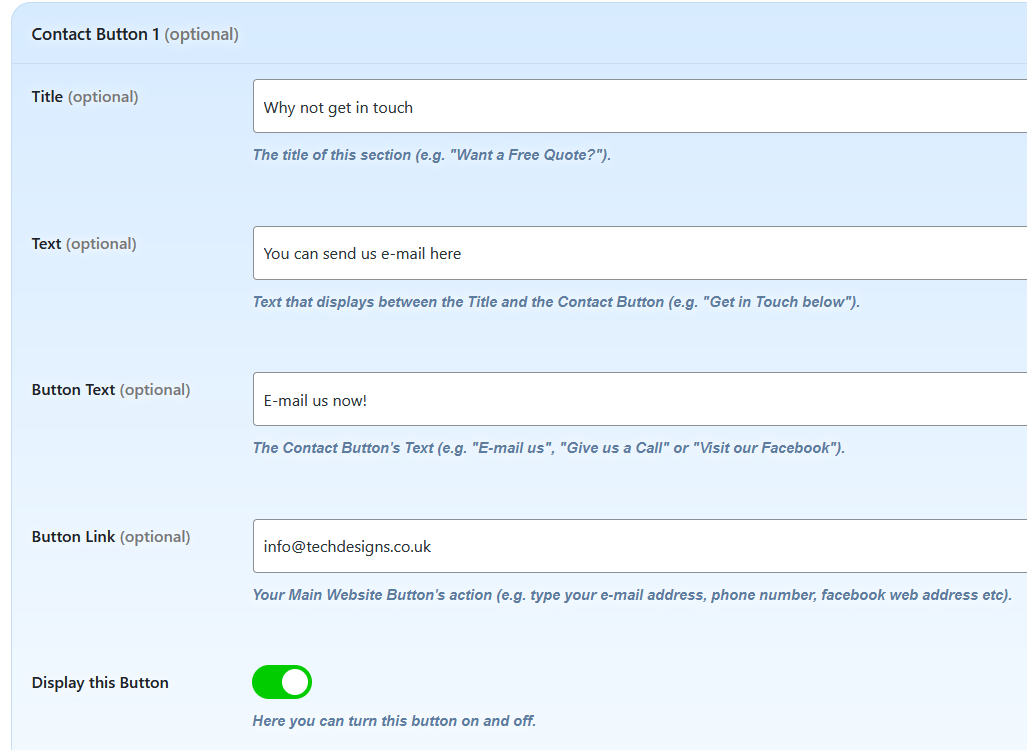
The Contact Buttons section enables you to setup buttons encouraging customers to get in touch.

These Contact Buttons are placed in-between the main content areas, prompting customers to E-mail you, Phone you, Visit your Facebook page, or whatever your main objective is.

Here's a summary of the items you can change in your Contact Buttons section.

Contact Buttons

For each Contact Button you can:

  • Add/Edit a main Title (e.g. "Want a Free Quote?").
  • Add/Edit text underneath this title (e.g. "Get in Touch below.").
  • Add/Edit the Button text (e.g. "Give us a Call.").
  • Add/Edit the Button link (e.g. "01234567890").
  • Show/Hide this Contact Button.

My software will automatically calculate whether the link you have added is an e-mail address, phone number or web address and will setup the button accordingly.

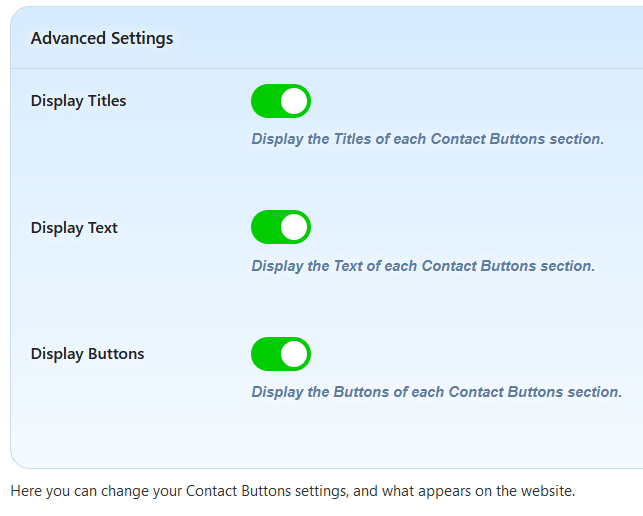
Contact Buttons Settings

You can also adjust the following settings:

  • Show/Hide the Titles of each Contact Buttons section.
  • Show/Hide the Text of each Contact Buttons section.
  • Show/Hide the Buttons of each Contact Buttons section.
Number of Contact Buttons

You can have up to 4 contact buttons on your website.

These buttons will only display if content is added to them - if they're blank then they won't show on your website.

Contact Buttons Screenshots

Here are some screenshots of the Contact Buttons section, so you get an idea of how it works.
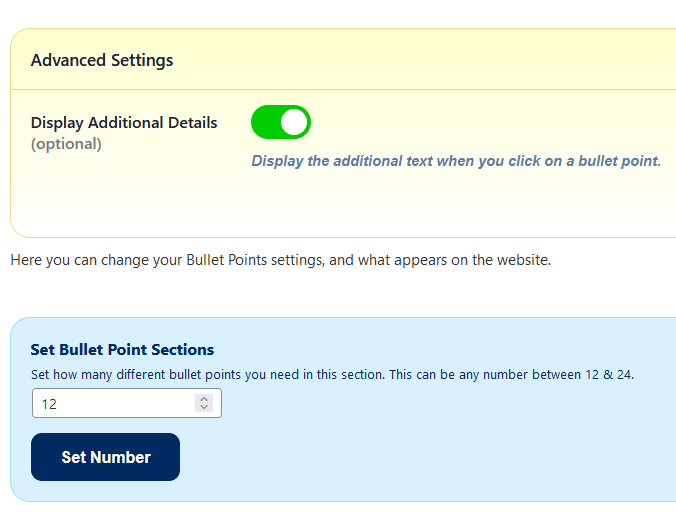
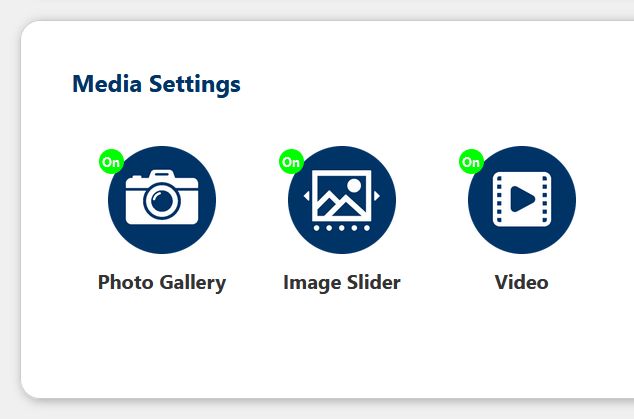
Screenshot of the Contact Buttons admin sectionScreenshot of the Contact Buttons admin section
Media Sections
×
Image Slider
Image Slider

The Image Slider section enables you to add a slideshow of photos & captions.

Here's a summary of the items you can edit in your Image Slider section.

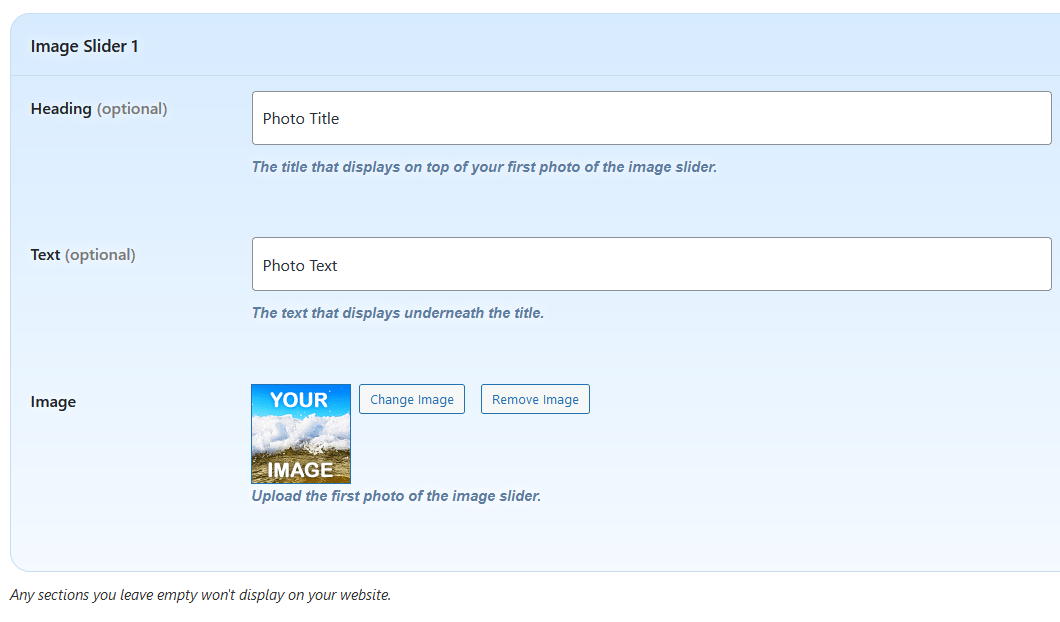
Image Slides

For each image slide you can:

  • Edit the Title (e.g. "Domestic Plumbing").
  • Edit the Text (e.g. "We offer a comprehensive service.")
  • Add/Remove a background image to appear underneath the text.

These image & text slides display in a slideshow, with navigation so users can view individual slides should they wish.

Image Slider Settings

You can also adjust the following settings:

  • Show/Hide Slider Arrows (Backwards & Forwards).
  • Show/Hide Slider Navigation (Lower navigation so you can view any slide).
Number of Image Slides

You can also set the number of Image Slides you can edit:

  • Select between 6 & 10 slides.

These slides will only display if content is added to them - if they're blank then they won't show on your website.

Image Slider Screenshots

Here are some screenshots of the Image Slider section, so you get an idea of how it works.

Screenshot of the Image Slider admin sectionScreenshot of the Image Slider admin section
×
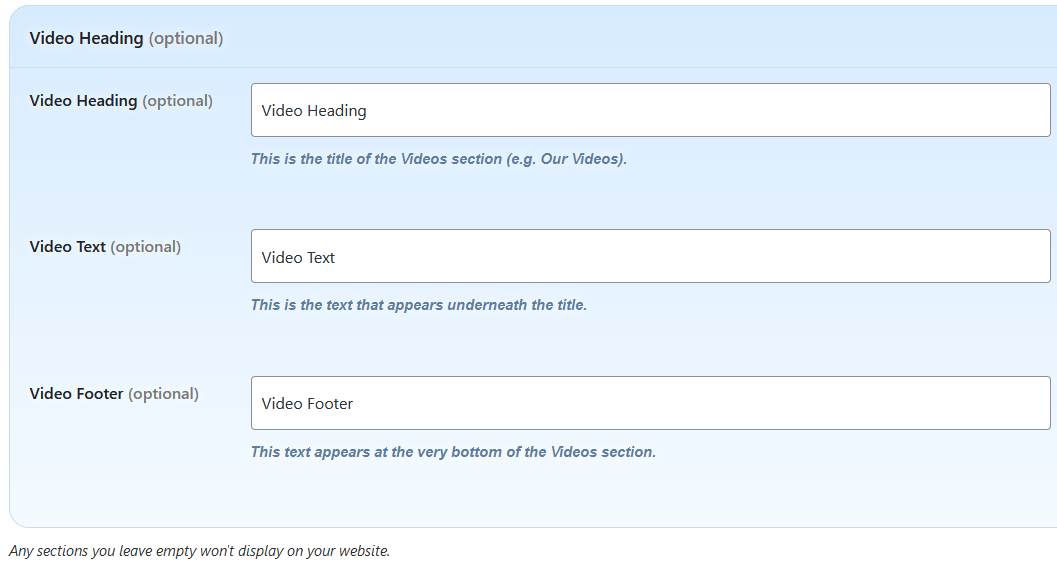
Video
Video

The Video section enables you to add videos to your website.

Here's a summary of the items you can change in your Video section.

Video Headings

For the Video section you can:

  • Add/Edit a main "Video" Title (e.g. "Our Videos").
  • Add/Edit text underneath this Title (e.g. "A few videos showcasing our work").
  • Add/Edit text at the bottom of the Video Section (e.g. "We'll be adding more videos soon!").
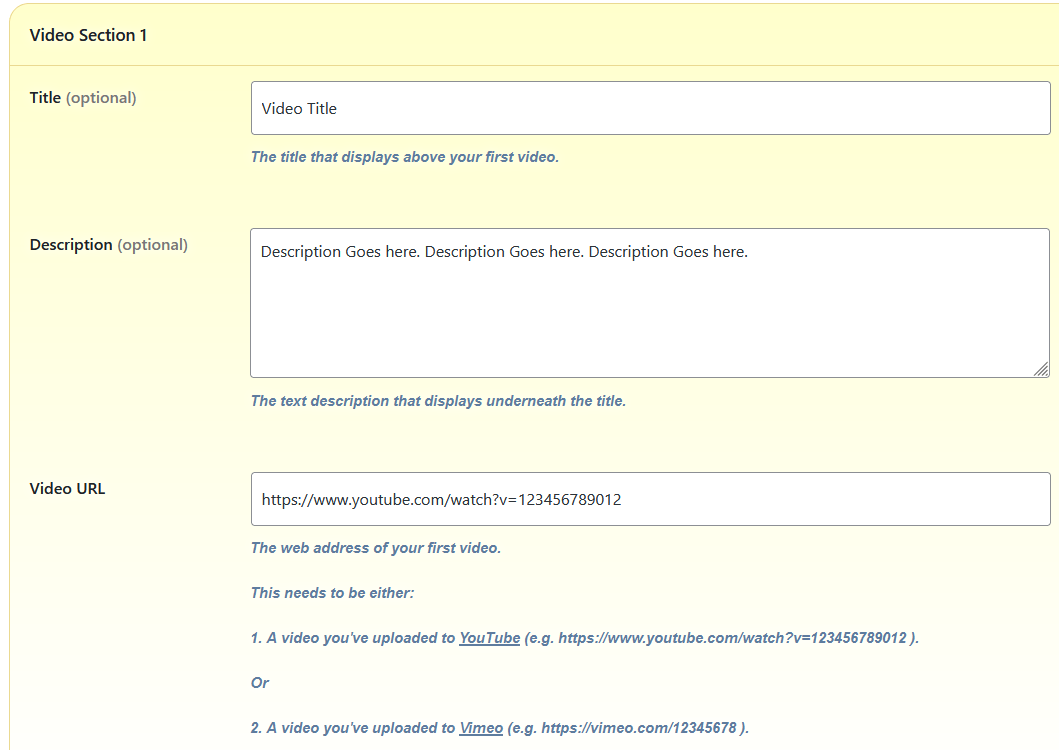
Video Items

For each video you can:

  • Edit the Video Title (e.g. "Our latest work").
  • Edit the Video Description (e.g. "This video showcases the work we've carried out for customers over the last few months.").
  • Add/Remove a video (hosted at either YouTube or Vimeo).

My software detects whether it is a YouTube or Vimeo video, and embeds it in the page accordingly.

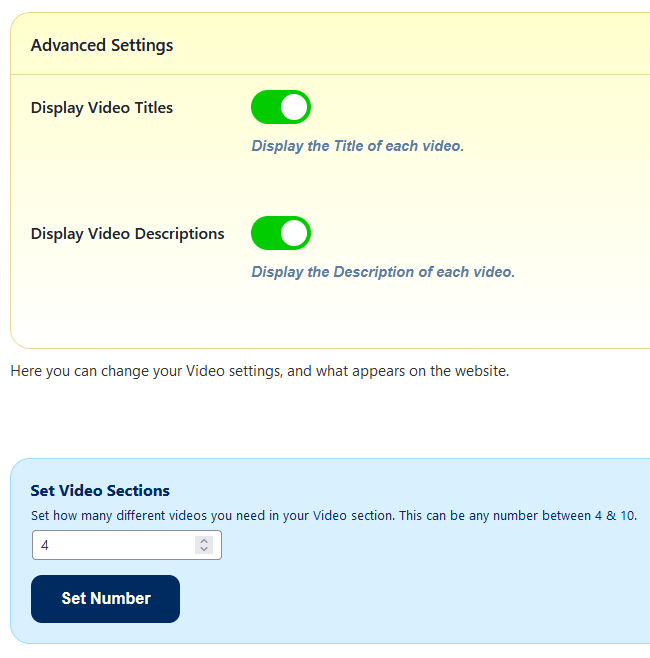
Video Settings

You can also adjust the following settings:

  • Show/Hide the Video Titles.
  • Show/Hide the Video Descriptions.
Number of Videos

You can also set the number of videos you can add to your website:

  • Select between 4 & 10 videos.

These videos will only display if content is added to them - if they're blank then they won't show on your website.

Video Screenshots

Here are some screenshots of the Video section, so you get an idea of how it works.

Screenshot of the Video admin sectionScreenshot of the Video admin sectionScreenshot of the Video admin section
Admin Sections
×
Search Engine Settings

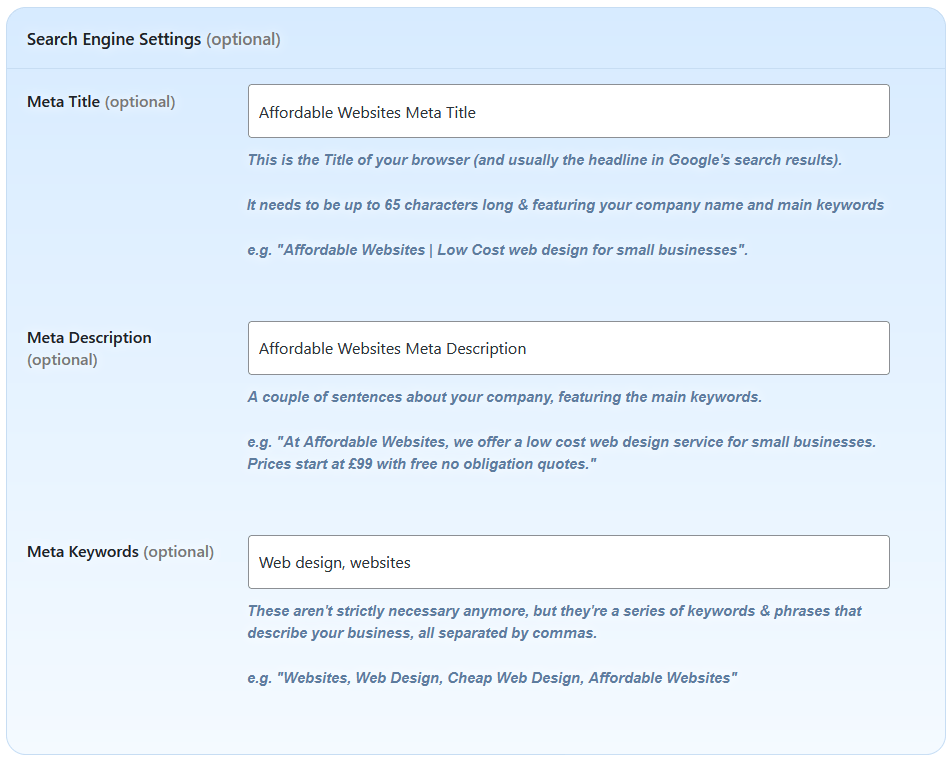
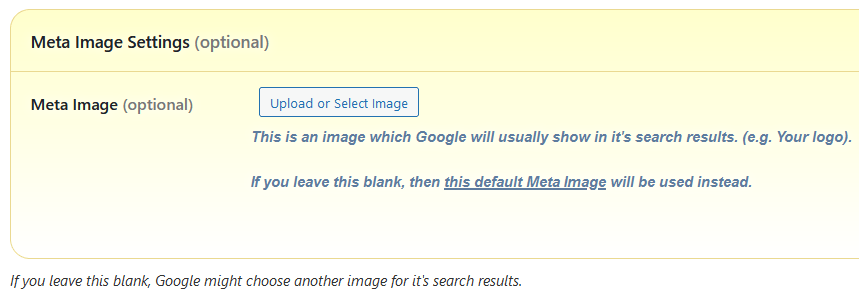
The Search Engine Settings section enables you to adjust your meta title, meta tags & meta image.

Here's a summary of the items you can change in your Search Engine section.

Meta Title

This is the Title of your browser (and usually the headline in Google's search results).

It needs to be up to 65 characters long, feature your company name & main keywords.

  • Add/Edit the Title tag.
Meta Description

A couple of sentences about your company, featuring your main keywords.

  • Add/Edit your Meta Description.
Meta Keywords

These aren't strictly necessary anymore, but they're a series of keywords & phrases that describe your business, all separated by commas.

  • Add/Edit your Meta Keywords.
Meta Image

An image which Google (& social media platforms) will try and show in it's search results. (e.g. Your logo).

  • Add/Remove your Meta Image.
Search Engine Settings Screenshots

Here are some screenshots of the Search Engine section, so you get an idea of how it works.

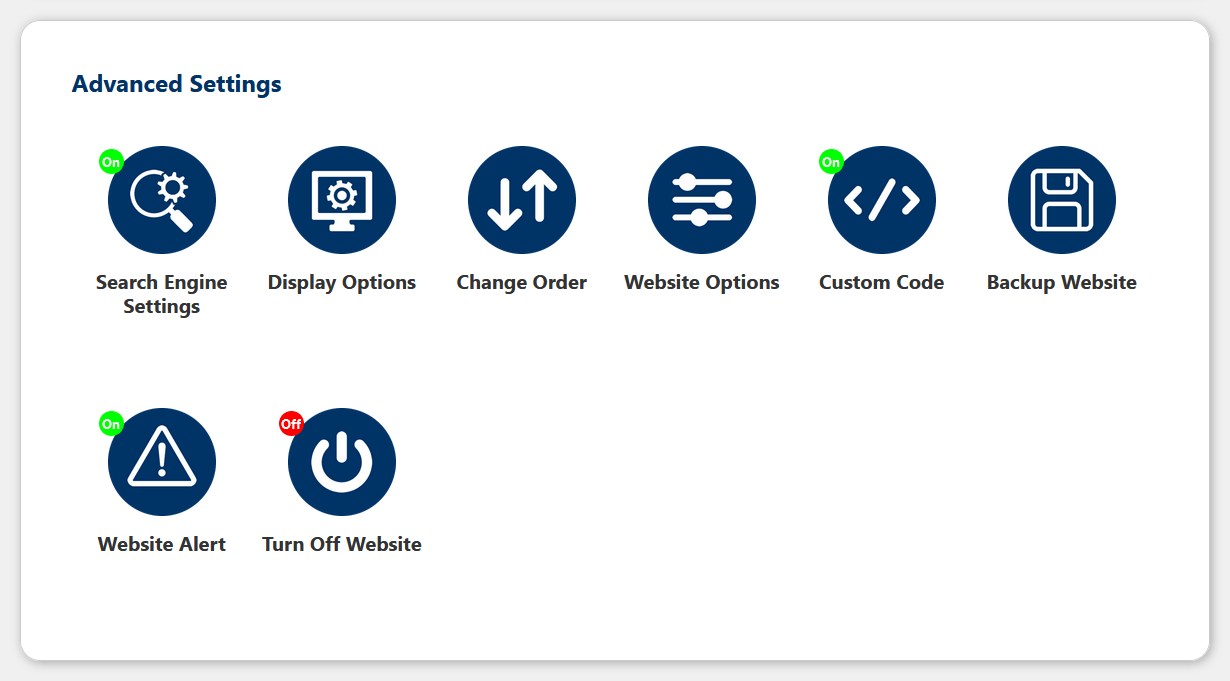
Screenshot of the Search Engines admin sectionScreenshot of the Search Engines admin section
×
Display Options
Display Options

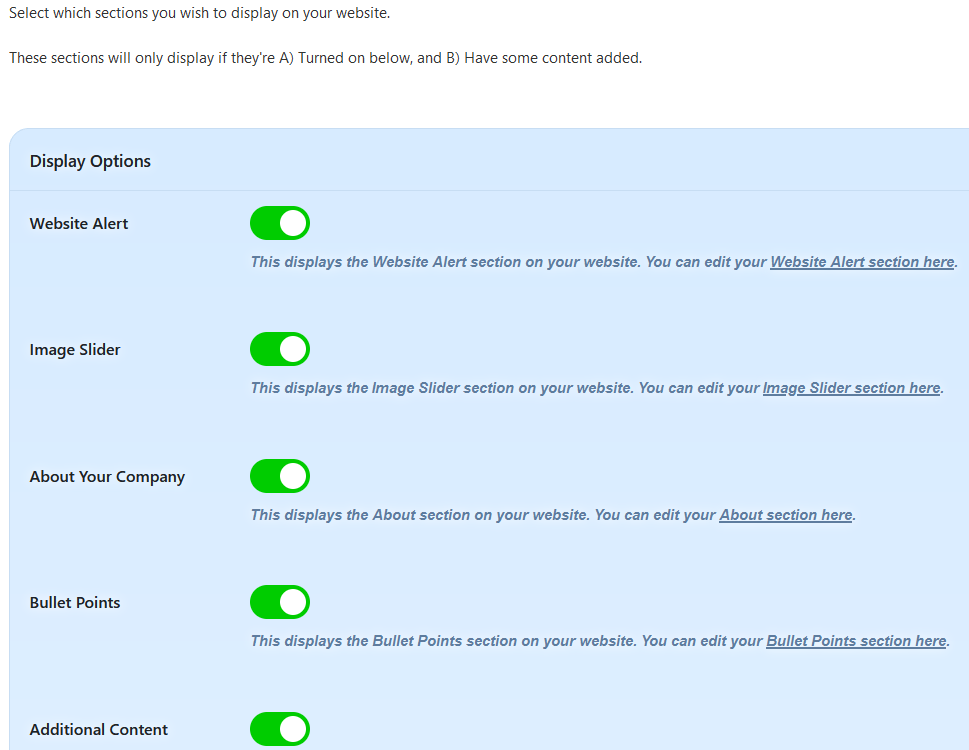
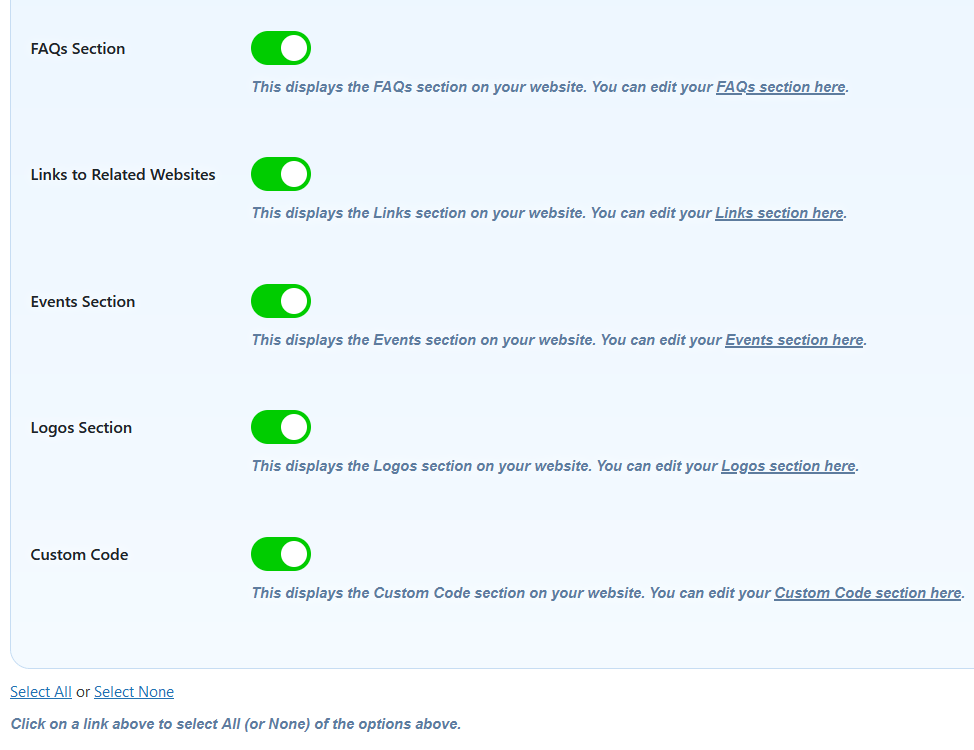
The Display options section enables you to Show & Hide various sections of your website.

Display Options

Here you can turn the following sections "On" or "Off":

  • Website Alert
  • Image Slider
  • About Your Company
  • Bullet Points
  • Additional Content
  • Latest News
  • Products
  • Price List
  • Your Services
  • Contact Details
  • Contact Enquiry Form
  • Google Maps
  • Social Media Links
  • Photo Gallery
  • Video Section
  • Staff Profiles
  • Customer Testimonials
  • Downloads Section
  • FAQs Section
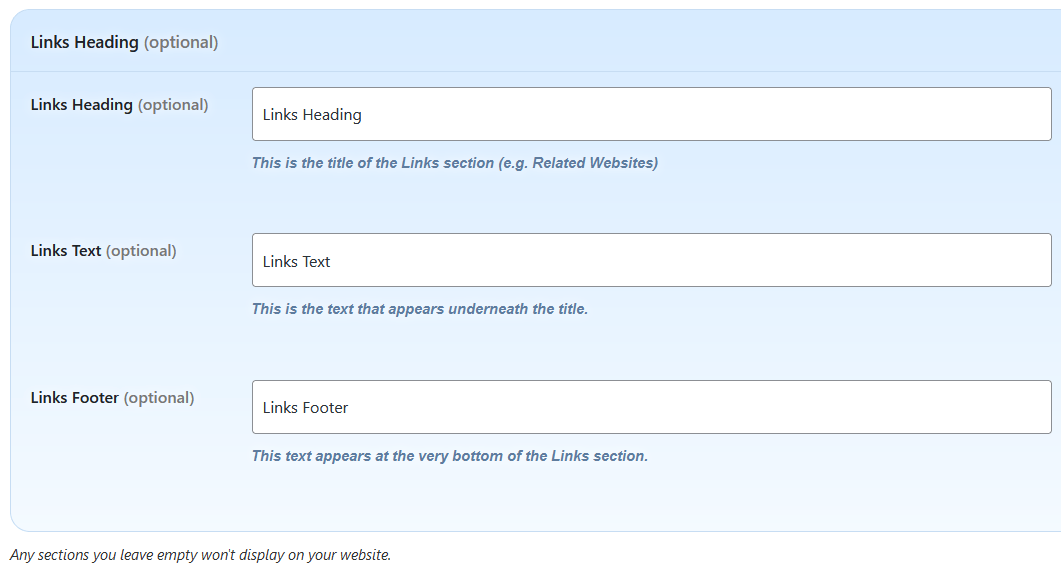
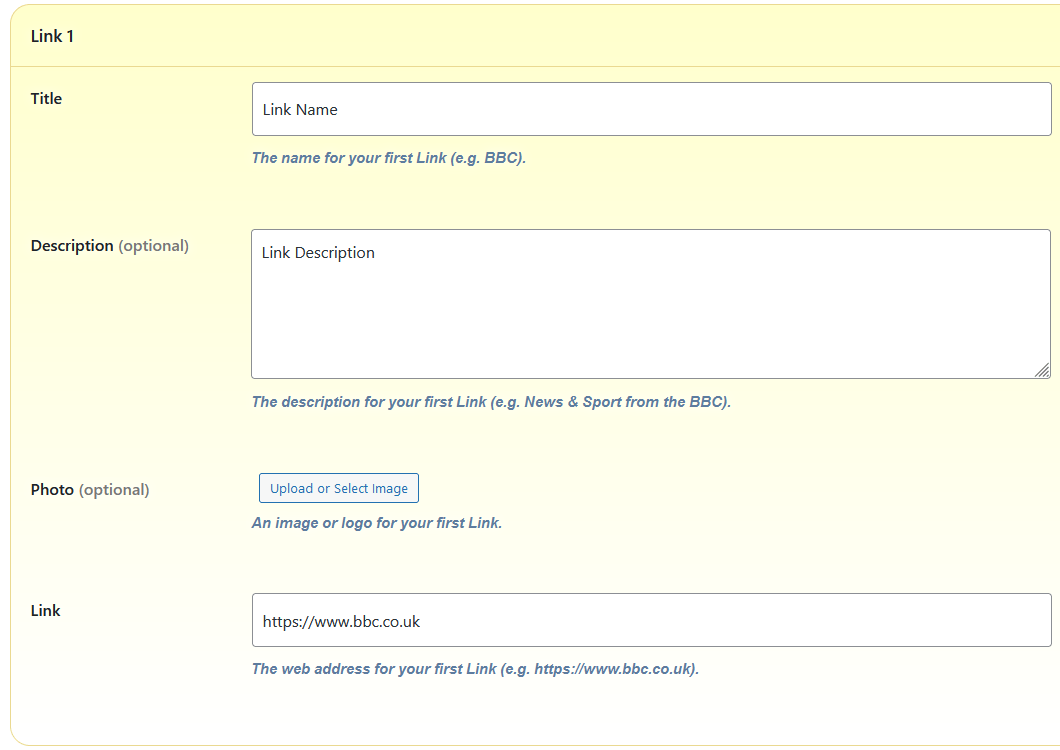
  • Links to Related Websites
  • Events Section
  • Logos Section
  • Custom Code

These sections will only display if they're A) Turned on, and B) Have some content added.

Display Options Screenshots

Here are some screenshots of the Display Options section, so you get an idea of how it works.

Screenshot of the Display Options admin sectionScreenshot of the Display Options admin section
×
Change Order
Change Order

The Change Order section enables you to change the order that the sections appear on your website (from top to bottom).

Drag & Drop

Simply Drag & Drop the sections into whatever order you want, click "Save Order" & your website will be updated.

The sections are either listed in White (if they are active) or Grey (if they are currently inactive).

Change Order Screenshots

Here are some screenshots of the Change Order section, so you get an idea of how it works.

Screenshot of the Change Order admin sectionScreenshot of the Change Order admin section
×
Website Options
Website Options

The Website Options section enables you to adjust miscellaneous options for your website.

Advanced Options

Here you can:

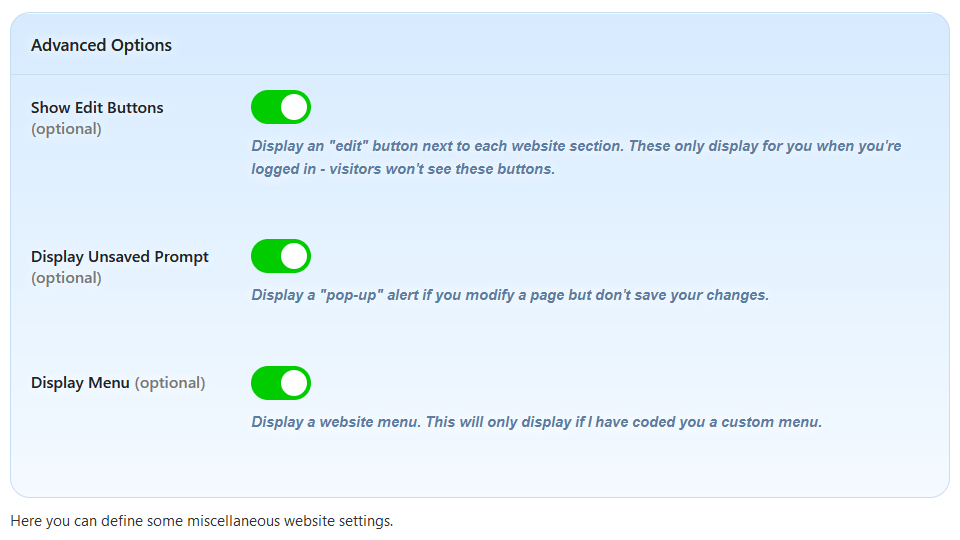
  • Show/Hide "Edit" Buttons.

These "edit" buttons are only visible to you (on your website's homepage). They provide a useful link to edit each section.

  • Display Unsaved Prompt.

This turns "On" or "Off" an alert on your website's admin control panel. If you edit a section but don't "Save" your changes, then the "Alert" lets you know that these changes will be lost.

  • Display Menu.

This displays a navigational menu on your website. This will only display if I have coded you a custom menu.

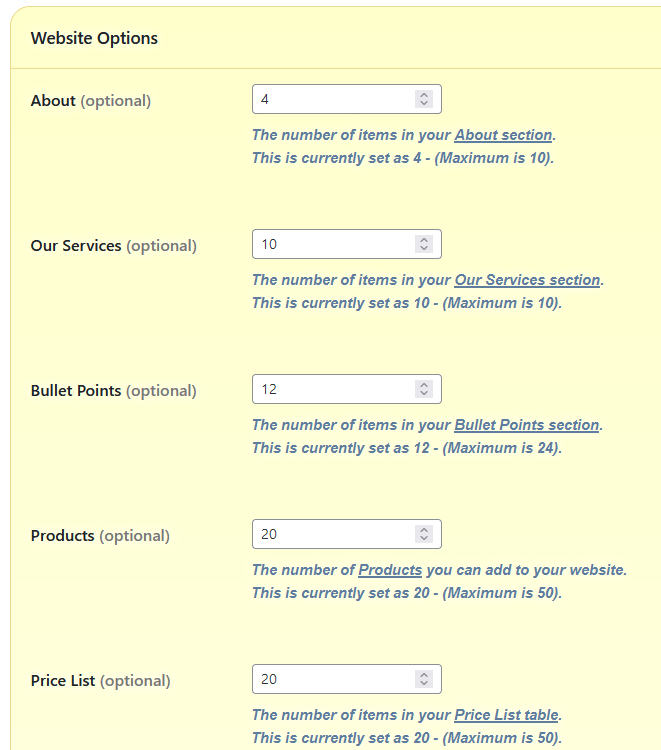
Website Options

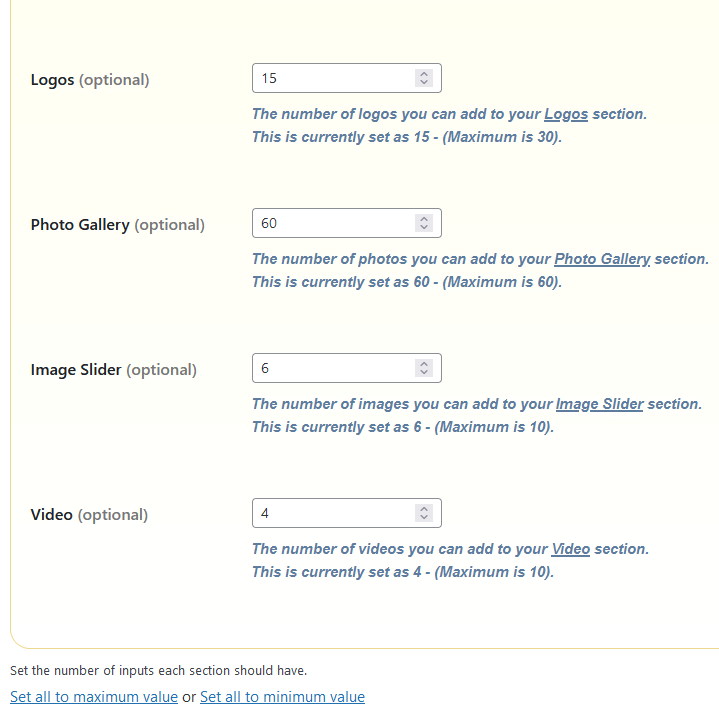
Listed here are the main sections of your website, and how many items are required for each of them.

Need to add more Products or Photos? Simply increase the number, click "Save" & you're good to go.

Website Options Screenshots

Here are some screenshots of the Website Options section, so you get an idea of how it works.

Screenshot of the Website Options admin sectionScreenshot of the Website Options admin sectionScreenshot of the Website Options admin section
×
Custom Code
Custom Code

The "Custom Code" section enables you to activate custom code on your website.

Essentially, if you had asked me to code something custom (specifically for you), then this is the section where you would be able to turn it "On" or "Off".

Custom Code Headings

For the Custom Code section you can:

  • Add/Edit a main "Custom Code" Title.
  • Add/Edit text underneath this Title.
  • Add/Edit text at the bottom of the Custom Code Section.
Advanced Settings

Here you can:

  • Show/Hide the "Custom Code" section.

This section will only display if A) It is turned "On" and B) I have actually coded something for you.

If the custom code file is empty, then nothing will display.

Custom Code Screenshots

Here are some screenshots of the Custom Code section, so you get an idea of how it works.

Screenshot of the Custom Code admin sectionScreenshot of the Custom Code admin section
×
Back up Website
Back up Website

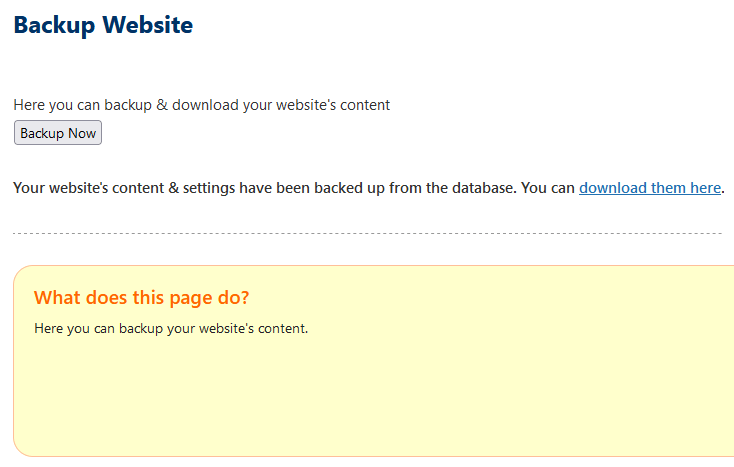
The "Back up Website" section enables you to back up your website's content.

Back up

By clicking the "Back up" button, the website will:

  • Download the website's content & settings.
  • Create a file for each section, and store the content inside.
  • Add all of this to a zip file that you can then download.
Back up Screenshots

Here are some screenshots of the Back up section, so you get an idea of how it works.
Screenshot of the Back up admin section
×
Alert
Alert

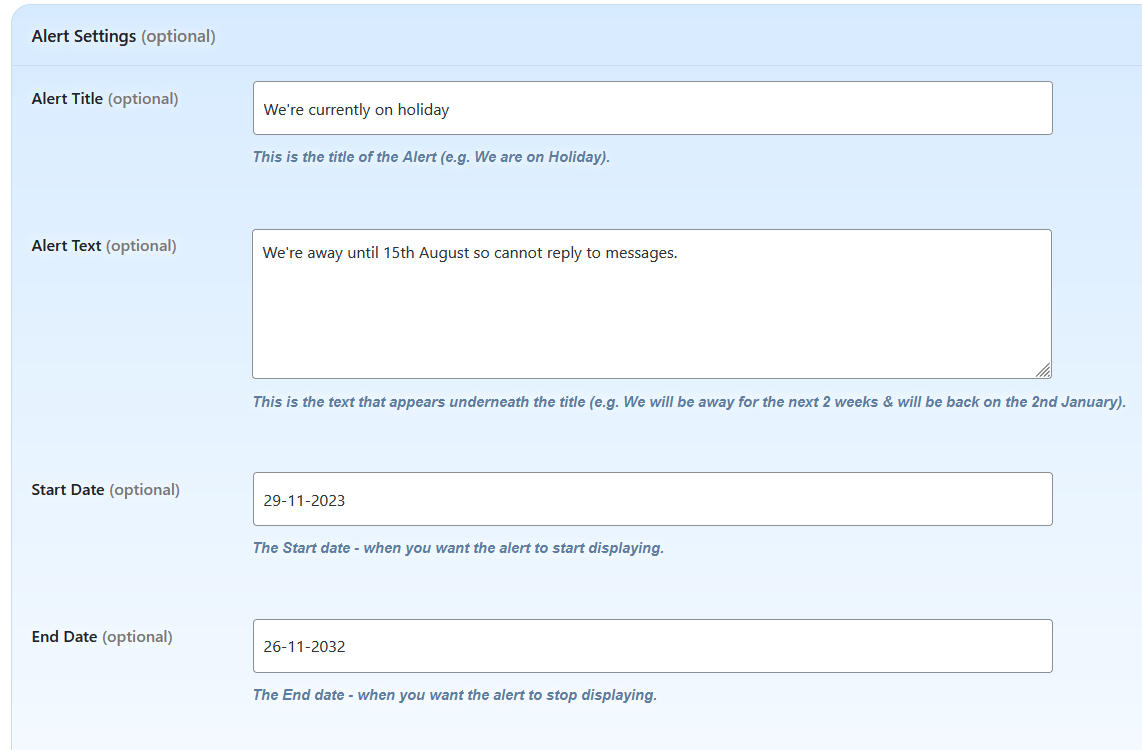
The "Alert" section enables you to display an alert message at the top of your website (e.g. We are on holiday for the next two weeks).

Website Alert

Here you can:

  • Add/Edit an Alert Title (e.g. "We are currently on holiday").
  • Add/Edit the Alert Text (e.g. "We will be away for the next two weeks").
  • Add/Edit the Alert Start Date (e.g. "29-11-2026").
  • Add/Edit the Alert End Date (e.g. "14-12-2026").

Your "Alert" will appear on your website during the time period you select.

If you don't select any start/end dates, then the Alert message will appear permanently.

Alert Screenshots

Here are some screenshots of the Alert section, so you get an idea of how it works.
Screenshot of the Alert admin section
×
Turn Off Website
Turn Off Website

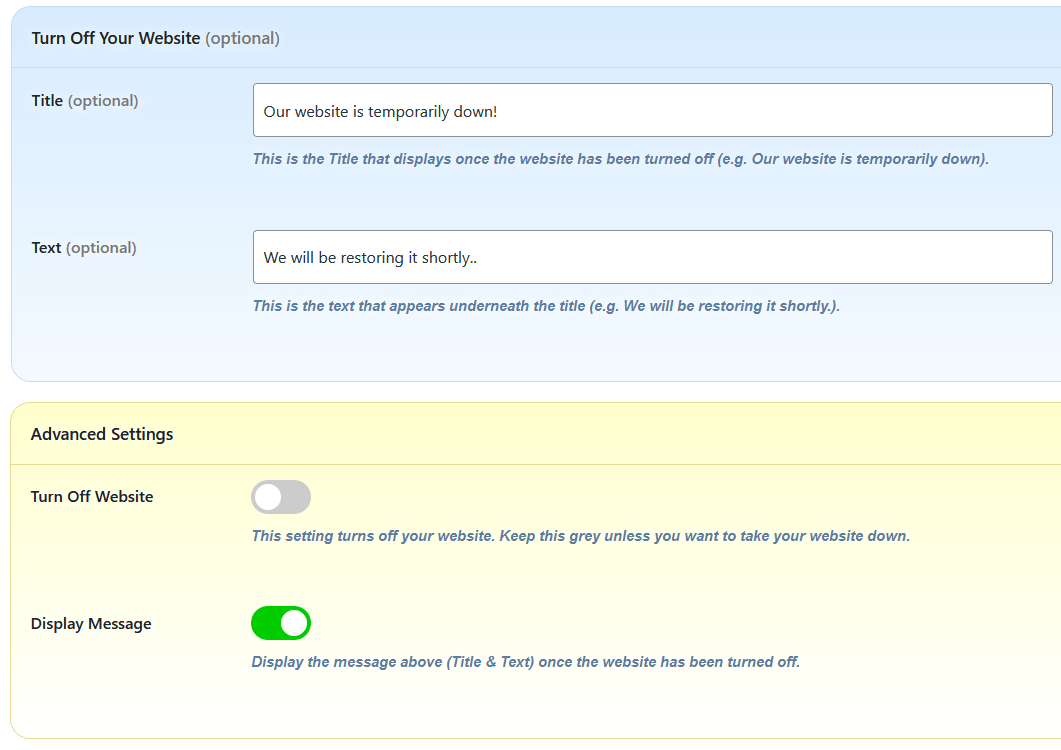
The "Turn Off Website" section enables you to turn off all your entire website, and display a message instead.

Turn Off Website

Here you can:

  • Add/Edit a Title to display (e.g. "Our website is temporarily down.").
  • Add/Edit some Text to display underneath (e.g. "We will be restoring it shortly when we've caught up with orders!").
Turn Off Settings

You can also adjust the following settings:

  • Turn Off Website

This turns your website off!

  • Display Message

Assuming you've turned your website off, this displays the "Turn Off" Title & text you have entered instead.

Turn Off Website Screenshots

Here are some screenshots of the Turn Off Website section, so you get an idea of how it works.
Screenshot of the Turn Off Website admin section
Support Sections
×
Customer Support
Customer Support

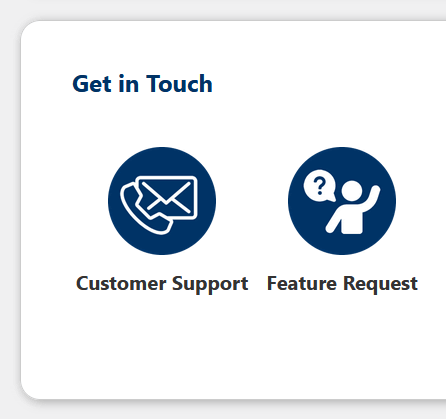
The "Customer Support" section enables you to get in touch with me with any questions.

Here you'll find:

  • My Phone Number
  • My Mobile Number
  • My E-mail Address
  • An Enquiry Form so you can easily get in touch.

This Enquiry Form is automatically populated with your name & contact details (from your website) to save you from typing it all out.

Customer Support Screenshots

Here are some screenshots of the Customer Support section, so you get an idea of how it works.
Screenshot of the Customer Support admin section
×
Feature Request
Feature Request

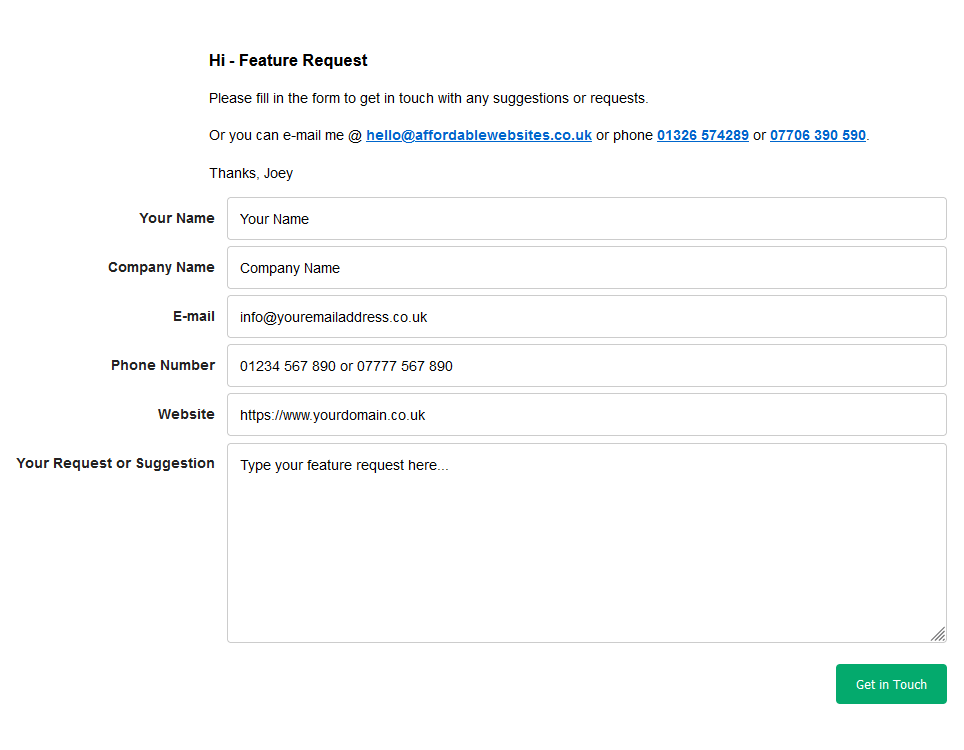
The "Feature Request" section enables you to suggest new features for this software.

Here you'll find:

  • A "Feature Request" contact form so you can easily get in touch.

This "Feature Request" contact form is automatically populated with your name & contact details (from your website) to save you from typing it all out.

Feature Request Screenshots

Here are some screenshots of the Feature Request section, so you get an idea of how it works.
Screenshot of the Feature Request admin section
Ready to order your website?

Get Started!

× Phone me on 07706 390 590